My iPad Pro Travel Photography Workflow (2026)
*Heads up: some links on this page are affiliate links, meaning I may earn a small commission if you make a purchase — at no extra cost to you. This helps keep the content free and the adventures going. I only ever recommend things I'd use myself.*
When I was in the planning stage for combining a life of travel and taking photography seriously, I mulled over how I'd download, store, organise and edit my pictures several times. The most common tool for this kind of heavy lifting is a MacBook Pro. If you haven't used a MacBook Pro before, their power comes with two costs - both financial and in terms of weight. They're chunky and expensive. So what alternatives are there?
I am firmly established in the Apple ecosystem, so I turned to another of their powerful tools to bridge the gap between performance and portability. The iPad Pro seemed to cover those categories nicely.
Two questions tend to come up whenever this setup comes up in conversation: can you actually edit RAW photos on an iPad Pro, and is Lightroom Mobile good enough for professional editing? I'll answer both properly, and as there's one significant "catch" that you need to know. Everything else is fantastic - let's take a deeper look at how I use the iPad Pro in my travel photography workflow.
The Gear
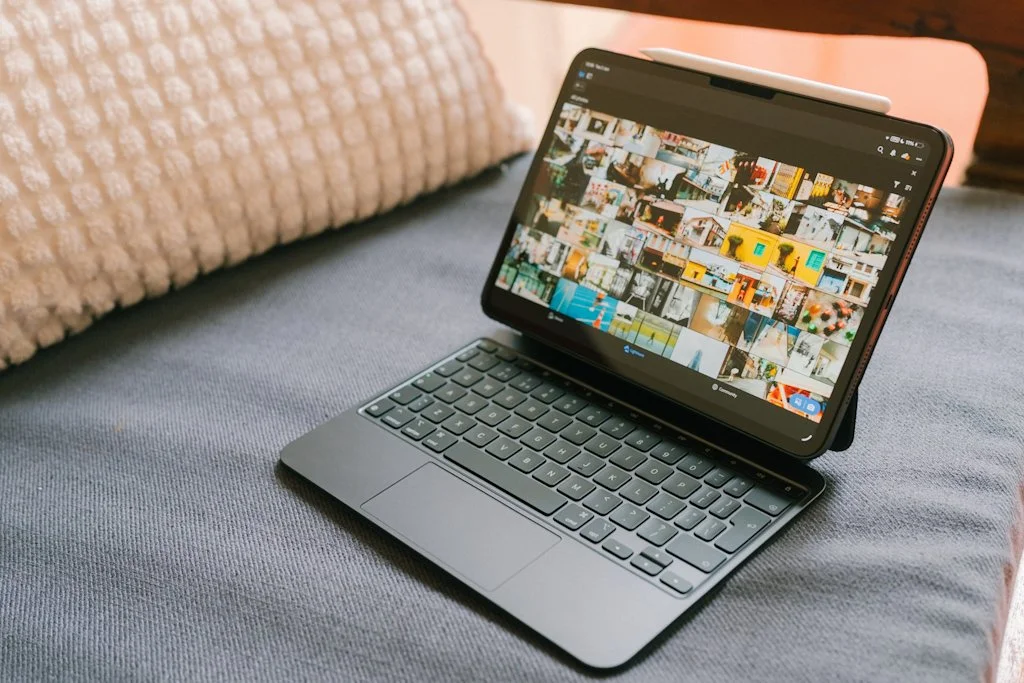
I have the 11-inch iPad Pro M4 256GB paired with the iPad Pro Magic Keyboard. I have the 11-inch version for portability and to keep the weight down - if you've ever handled the bigger version, you'll know it's rather large and cumbersome. So despite it having a "better" screen for photo editing, I don't think it's worth it. You're better off going with a MacBook Pro.
The Magic Keyboard is the ultimate accessory for the iPad Pro. It genuinely turns the iPad into a viable full-time working solution. I'm typing on it right now, and it feels like I'm working on a baby MacBook Pro. I'd highly recommend you invest in one too.
I also have the Apple Pencil Pro. Editing with a pencil is so intuitive, and whilst I'm not much of a painter, it's nice to get into the image a lot more. I do think the Pro version of the pencil is a little overkill for editing images though - it's definitely aimed more at digital art.
[Picture]
On cost, this set up is also much cheaper - as of June 2026, the price difference between the current iPad Pro M5 + Magic Keyboard + Apple Pencil Pro combo and the current base model MacBook Pro sits at £572. You can get half way across the world with that price difference!
Weight wise, the iPad Pro 11-inch + Magic Keyboard + Apple Pencil Pro is 500g lighter than the base model 14-inch MacBook Pro. That is not to be sniffed at when travelling light across the world.
There are only a few other bits of gear worth mentioning here - I use a memory card reader to load images into Lightroom via the USB-C port, and my charging set-up isn't the original Apple stuff. I use a 70W travel adapter with a generic long USB-C cable for charging - that way I don't need a separate iPad charger, saving on weight and bulk.
iPad Pro Software
iPadOS has come a long way in the last few years. It feels less like a giant phone and more like a baby MacBook than it ever has. At the time of writing, the iPad is on version 26.5 and I do not have any software issues that cause me any photo editing problems.
Arguably the most important piece of software is Lightroom. The most commonly cited issue for RAW photo editing with an iPad is that you can only use a slightly beefed-up version of Lightroom Mobile on the iPad. You cannot use Lightroom Classic.
Is Lightroom Mobile a problem? Is it a viable option for serious photographers? Is working from the cloud whilst travelling possible? I'll go into that a bit more later.
The Workflow - Importing and Syncing
Following a day out with the Sony A7C II, I'll remove the memory card, slot it into my memory card reader and plug it into the iPad via the single USB-C port.
After loading up Lightroom, I'll make sure I'm in the correct folder and album location. For travel photography, I set my folders up like so:
Travel > Year > Country > City/Region
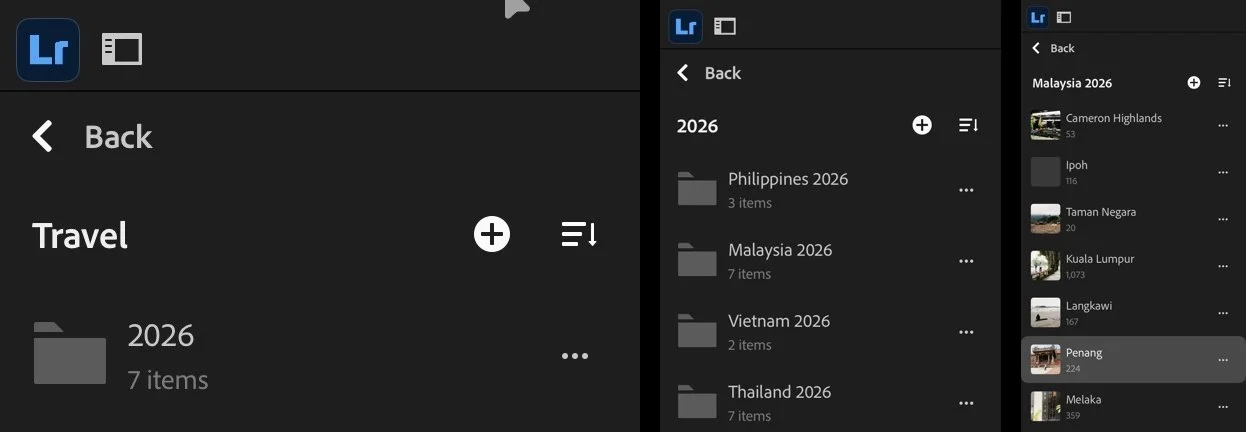
I also have Client and Personal folders with various sub-folders and albums, but there's no need to share those.
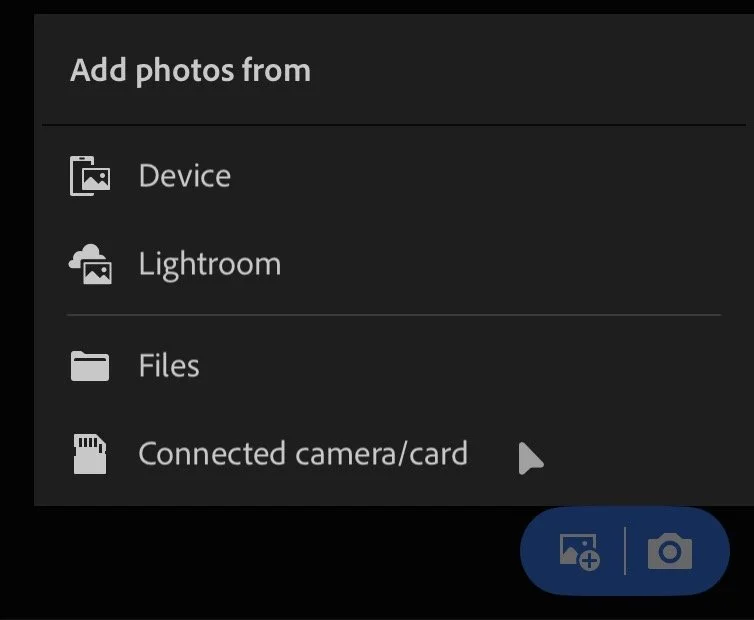
When I'm in the right folder, I'll go to the bottom right and click the blue Add Photos icon and select from "Connected camera/card".
The next screen is the import screen, where all of the images that are not already in the Lightroom library are automatically highlighted. Click Import.
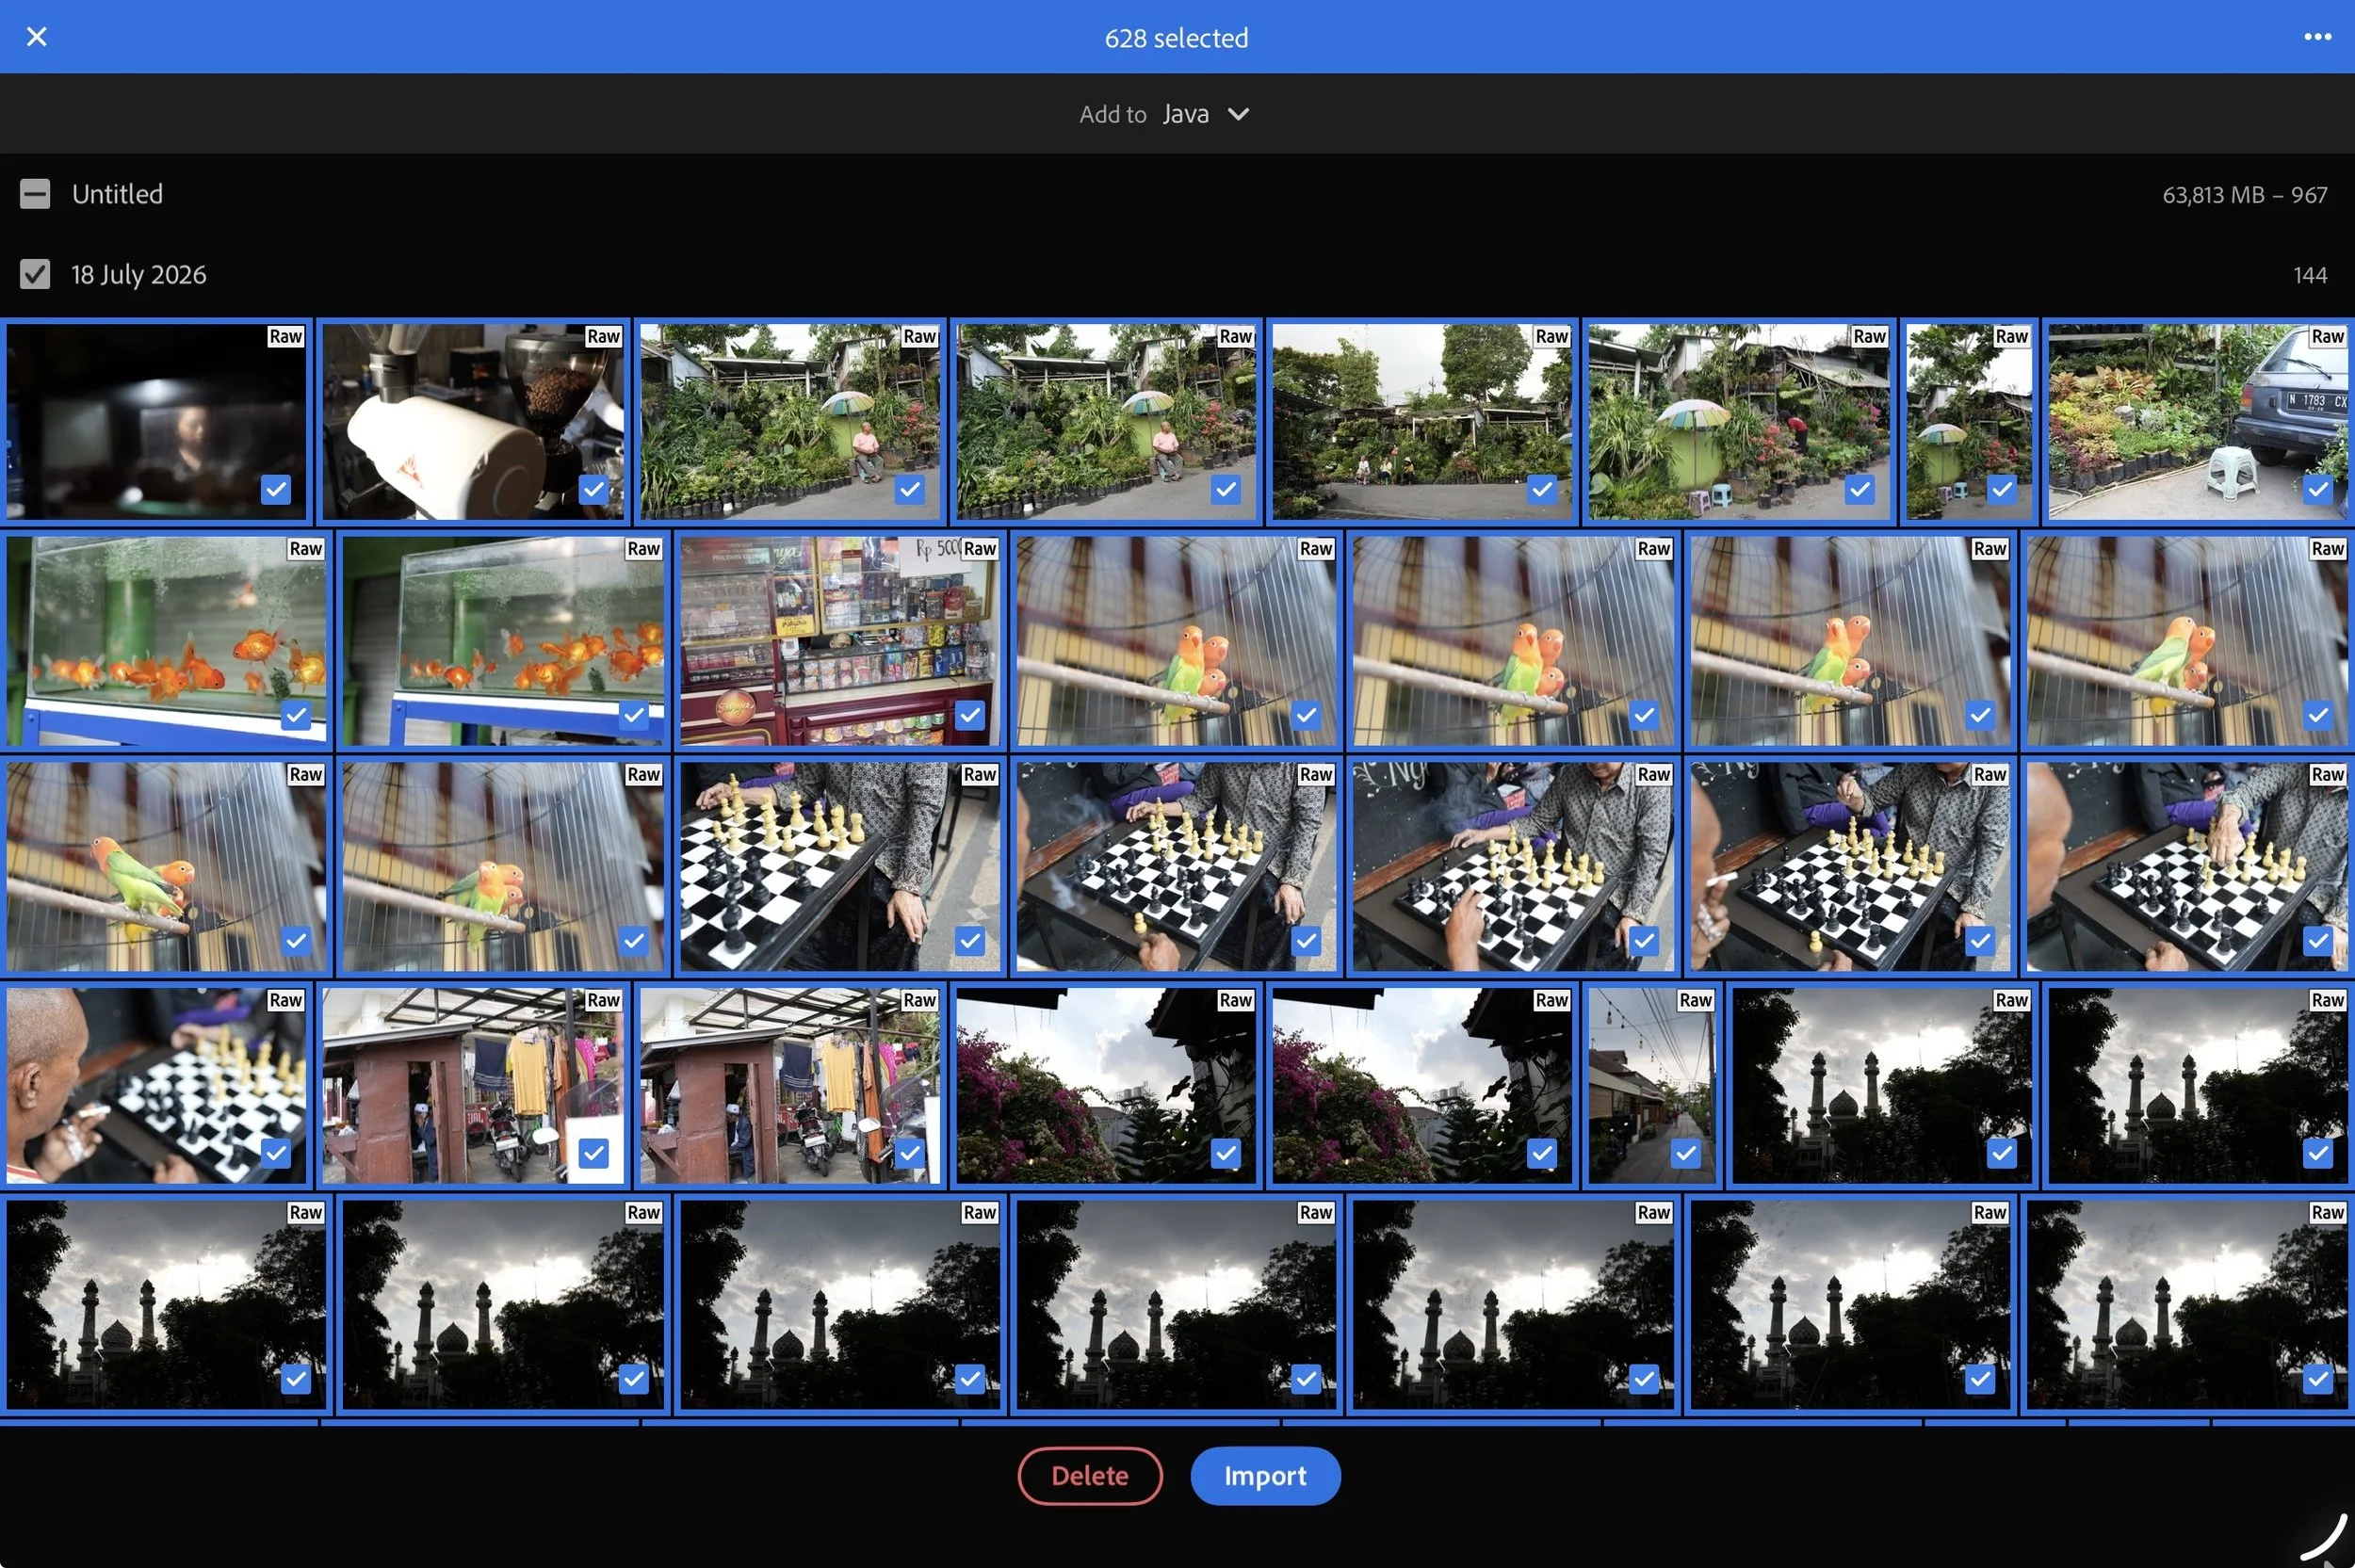
Providing you have enough available storage space on the iPad, Lightroom will then pull all of the selected files from the memory card and into the correct folder. For the iPad Pro M4 and my Sony uncompressed RAW files, this only takes a minute or so, obviously depending on how many files there are.
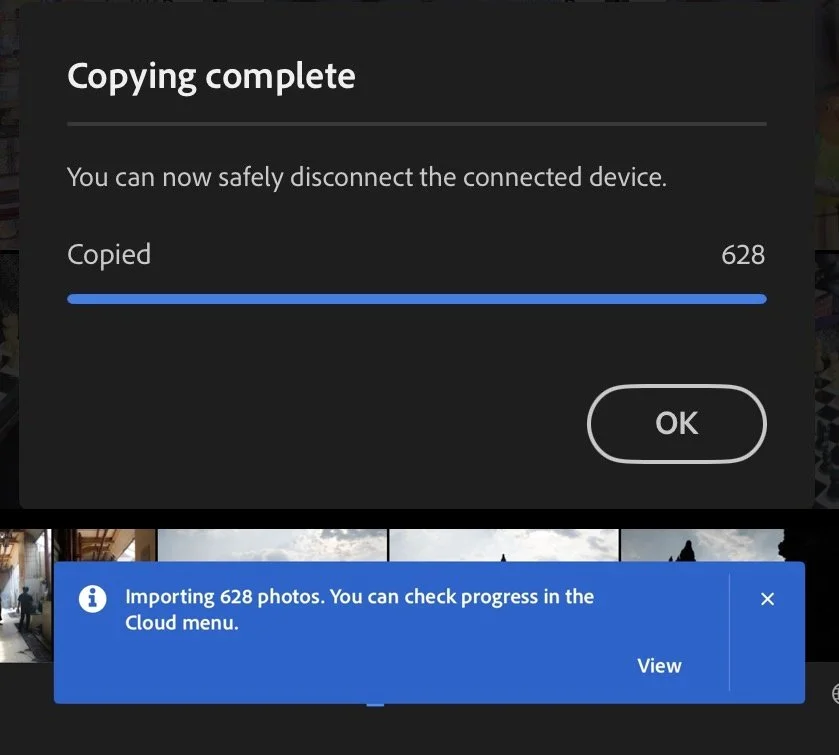
Once they have landed in the album, syncing will automatically begin to load them into your Adobe Cloud storage. Depending on your Wi-Fi strength and how full the iPad is, this can take some time. I usually have the iPad plugged in and charging with Lightroom open and allowing the syncing to occur.
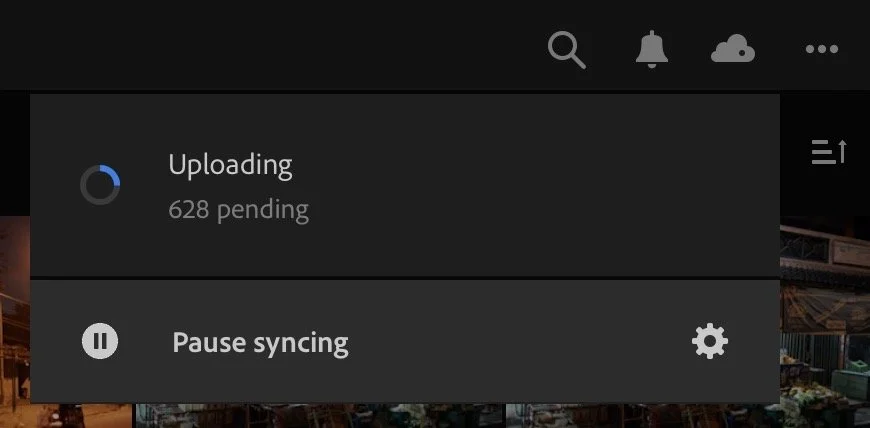
Importantly here, I don't start editing anything until the syncing is complete, but I do start culling while the files are on the iPad. I can usually cull things that haven't already been synced, which saves a little time and cloud storage.
The Workflow - Culling and Organising
Whilst syncing is ongoing, I will use the keyboard to perform the "first pass" flick through of the newly imported files in full screen mode (Press F on the keyboard for the Full Screen view). The purpose of this first pass is to get rid of the duds and anything I'm never going to use. Whilst toggling through with the Left and Right arrows, I reject-flag anything that is never going to be used using the X key.
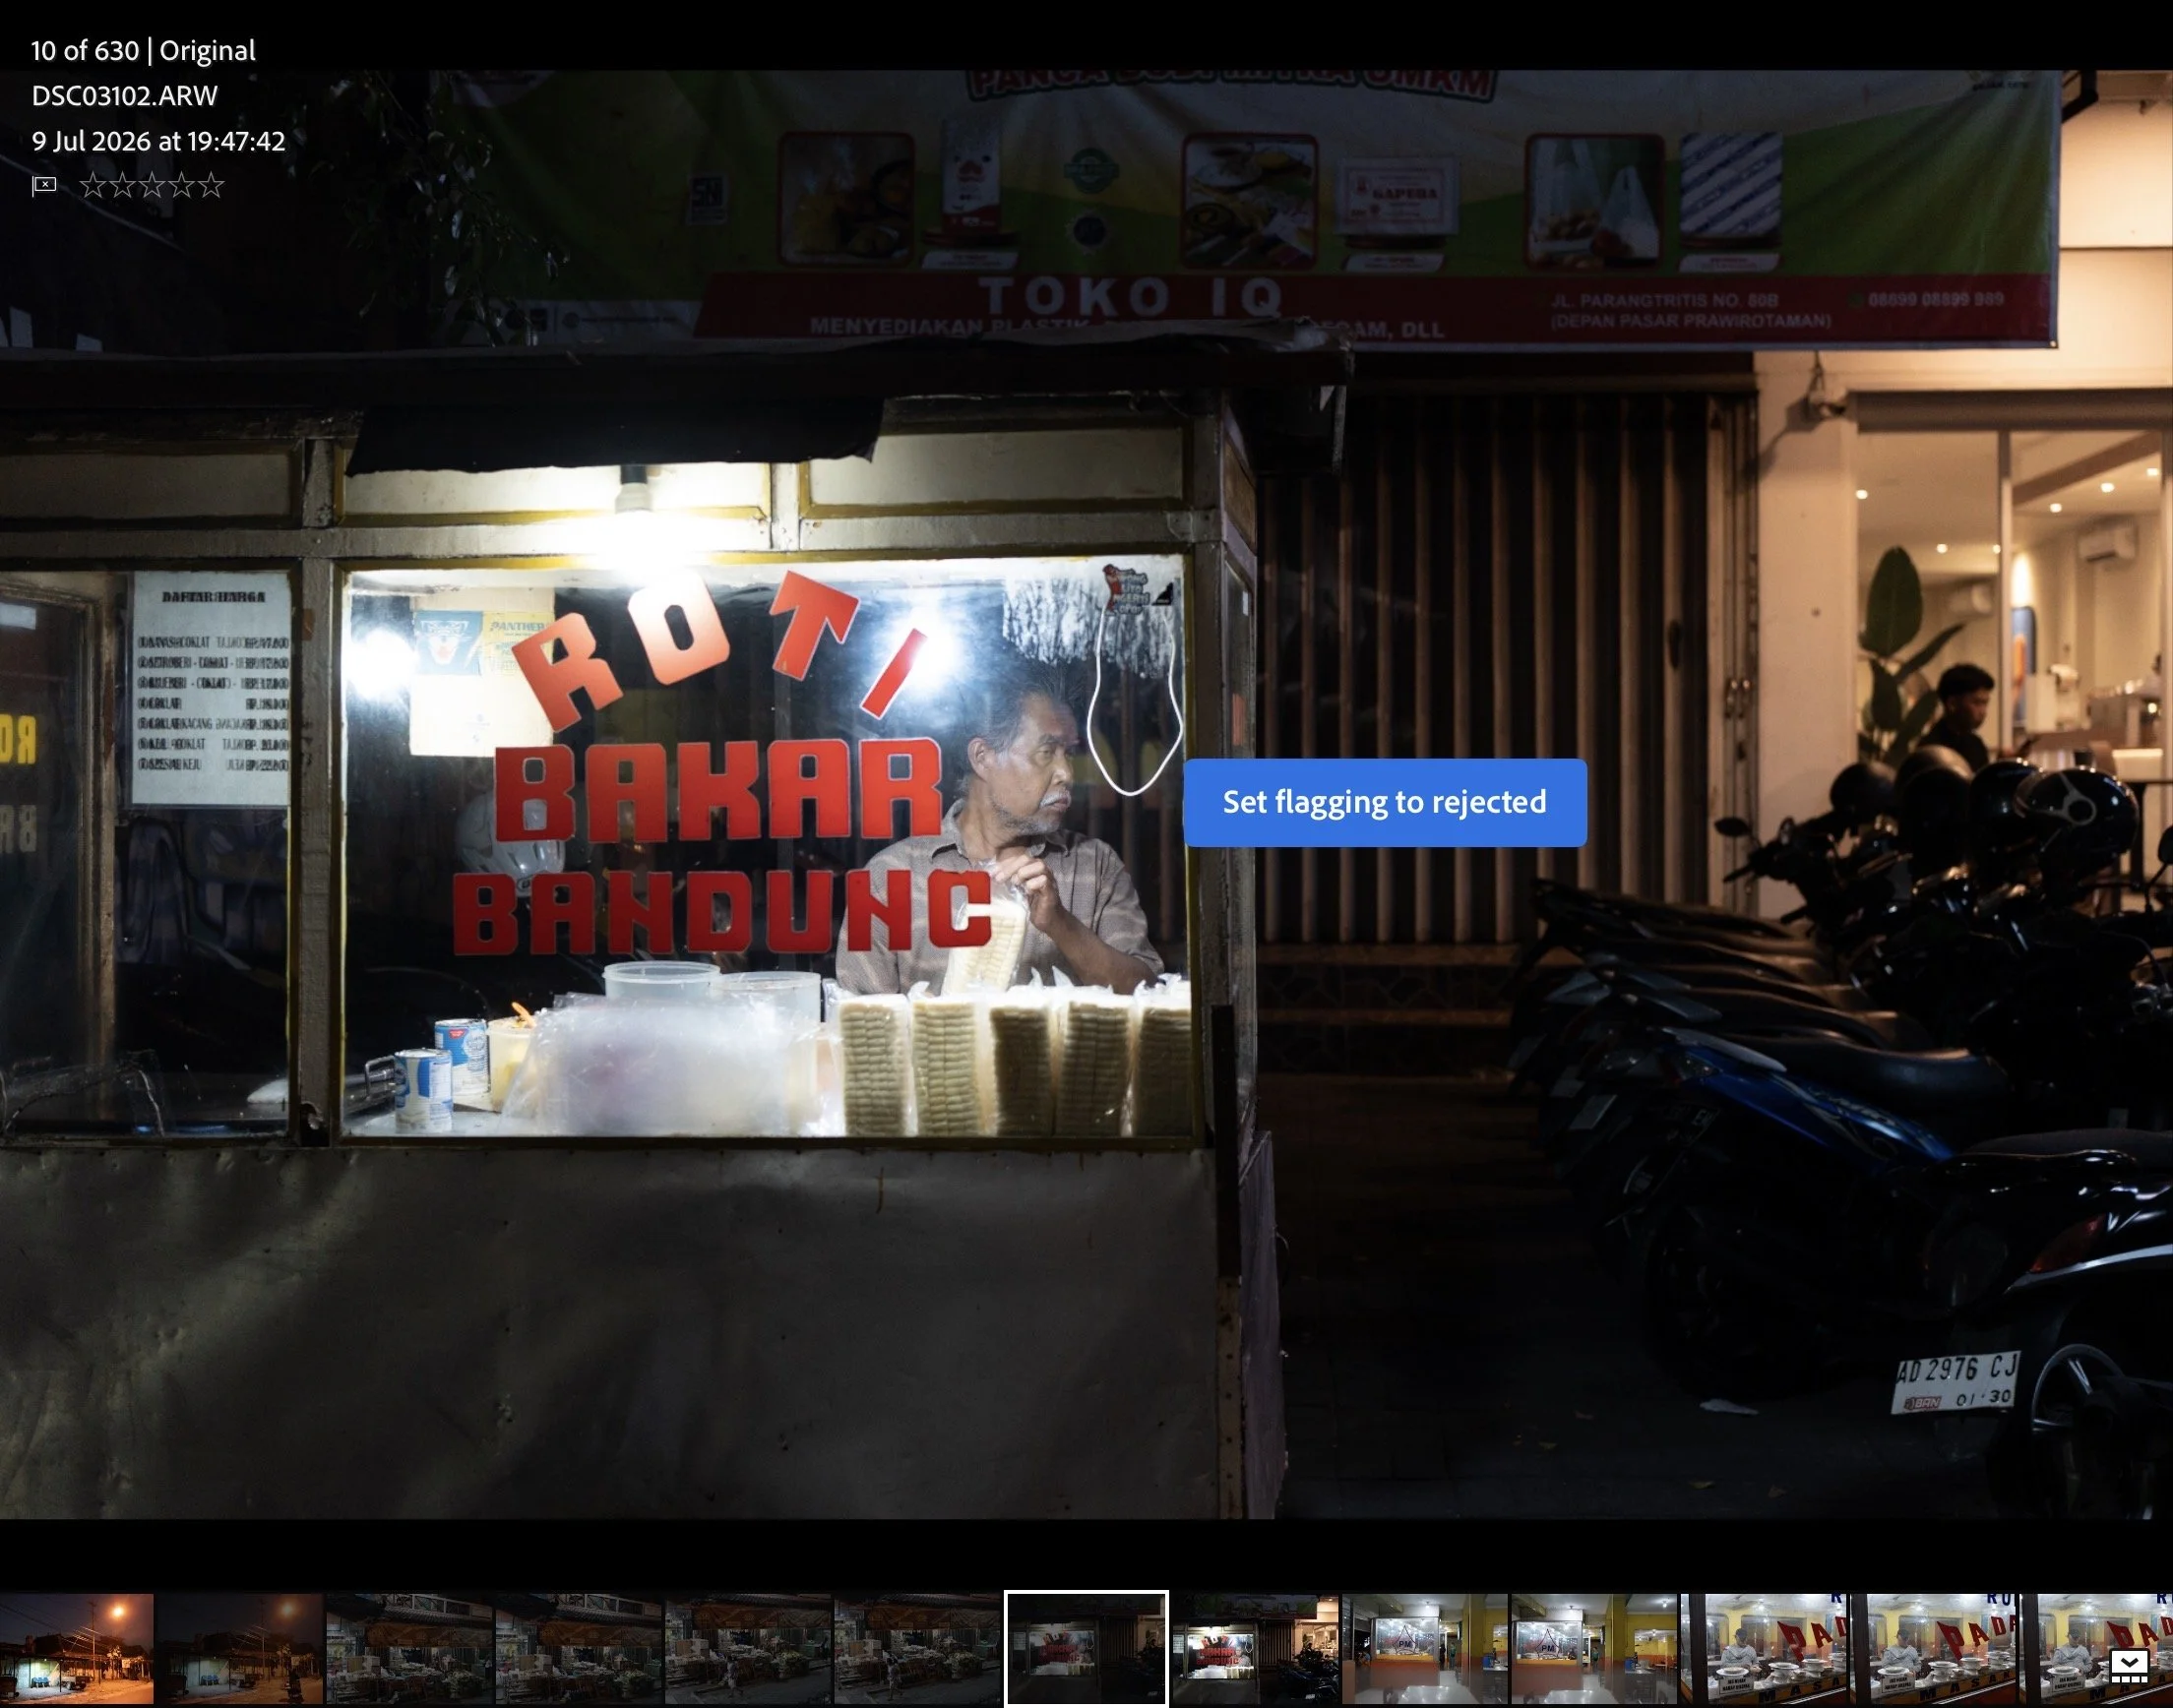
Anything that is a personal travel photo will be moved to a Personal folder during this first pass and removed from the travel album.
Anything I'm not sure about or might be good is left unflagged until the second pass.
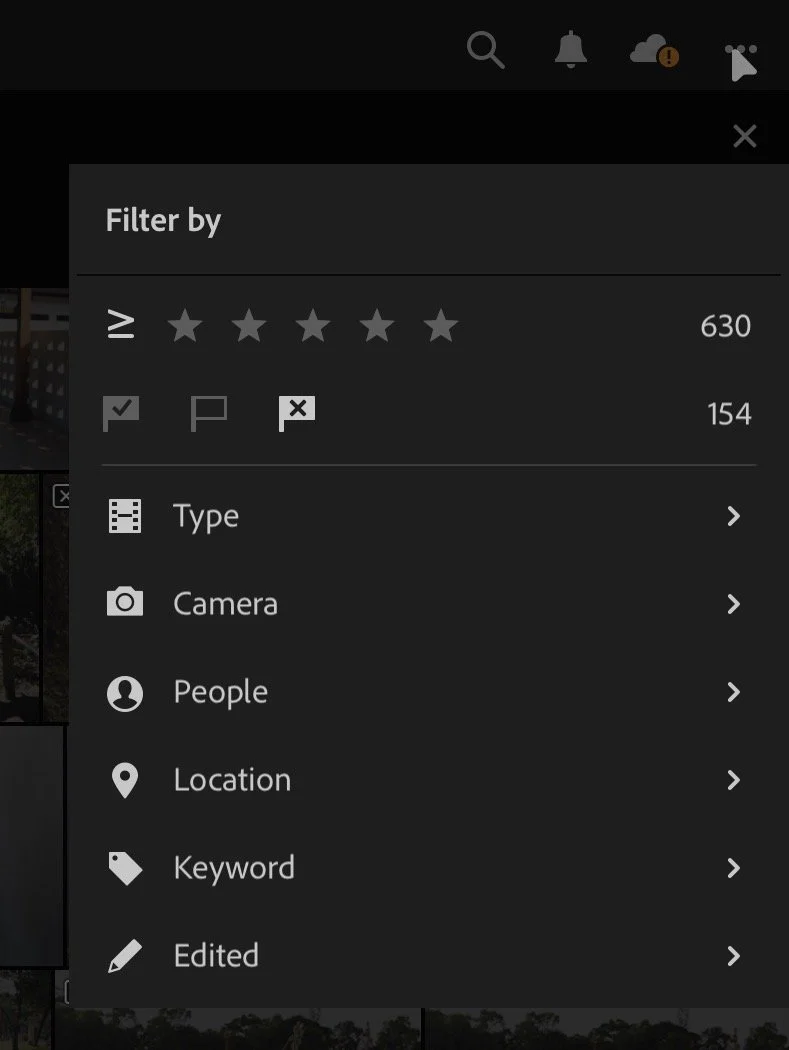
Once I have flagged the rubbish (there's more than you think), I'll then return to the relevant album view (press the G key) and go to the filter icon, filter by Reject flag, click the three dots in the top right to batch edit, Select All, then Remove > Delete. At this point you'll get a warning so you can acknowledge that these photos will be deleted, but you can retrieve them from the trash within 30 days.
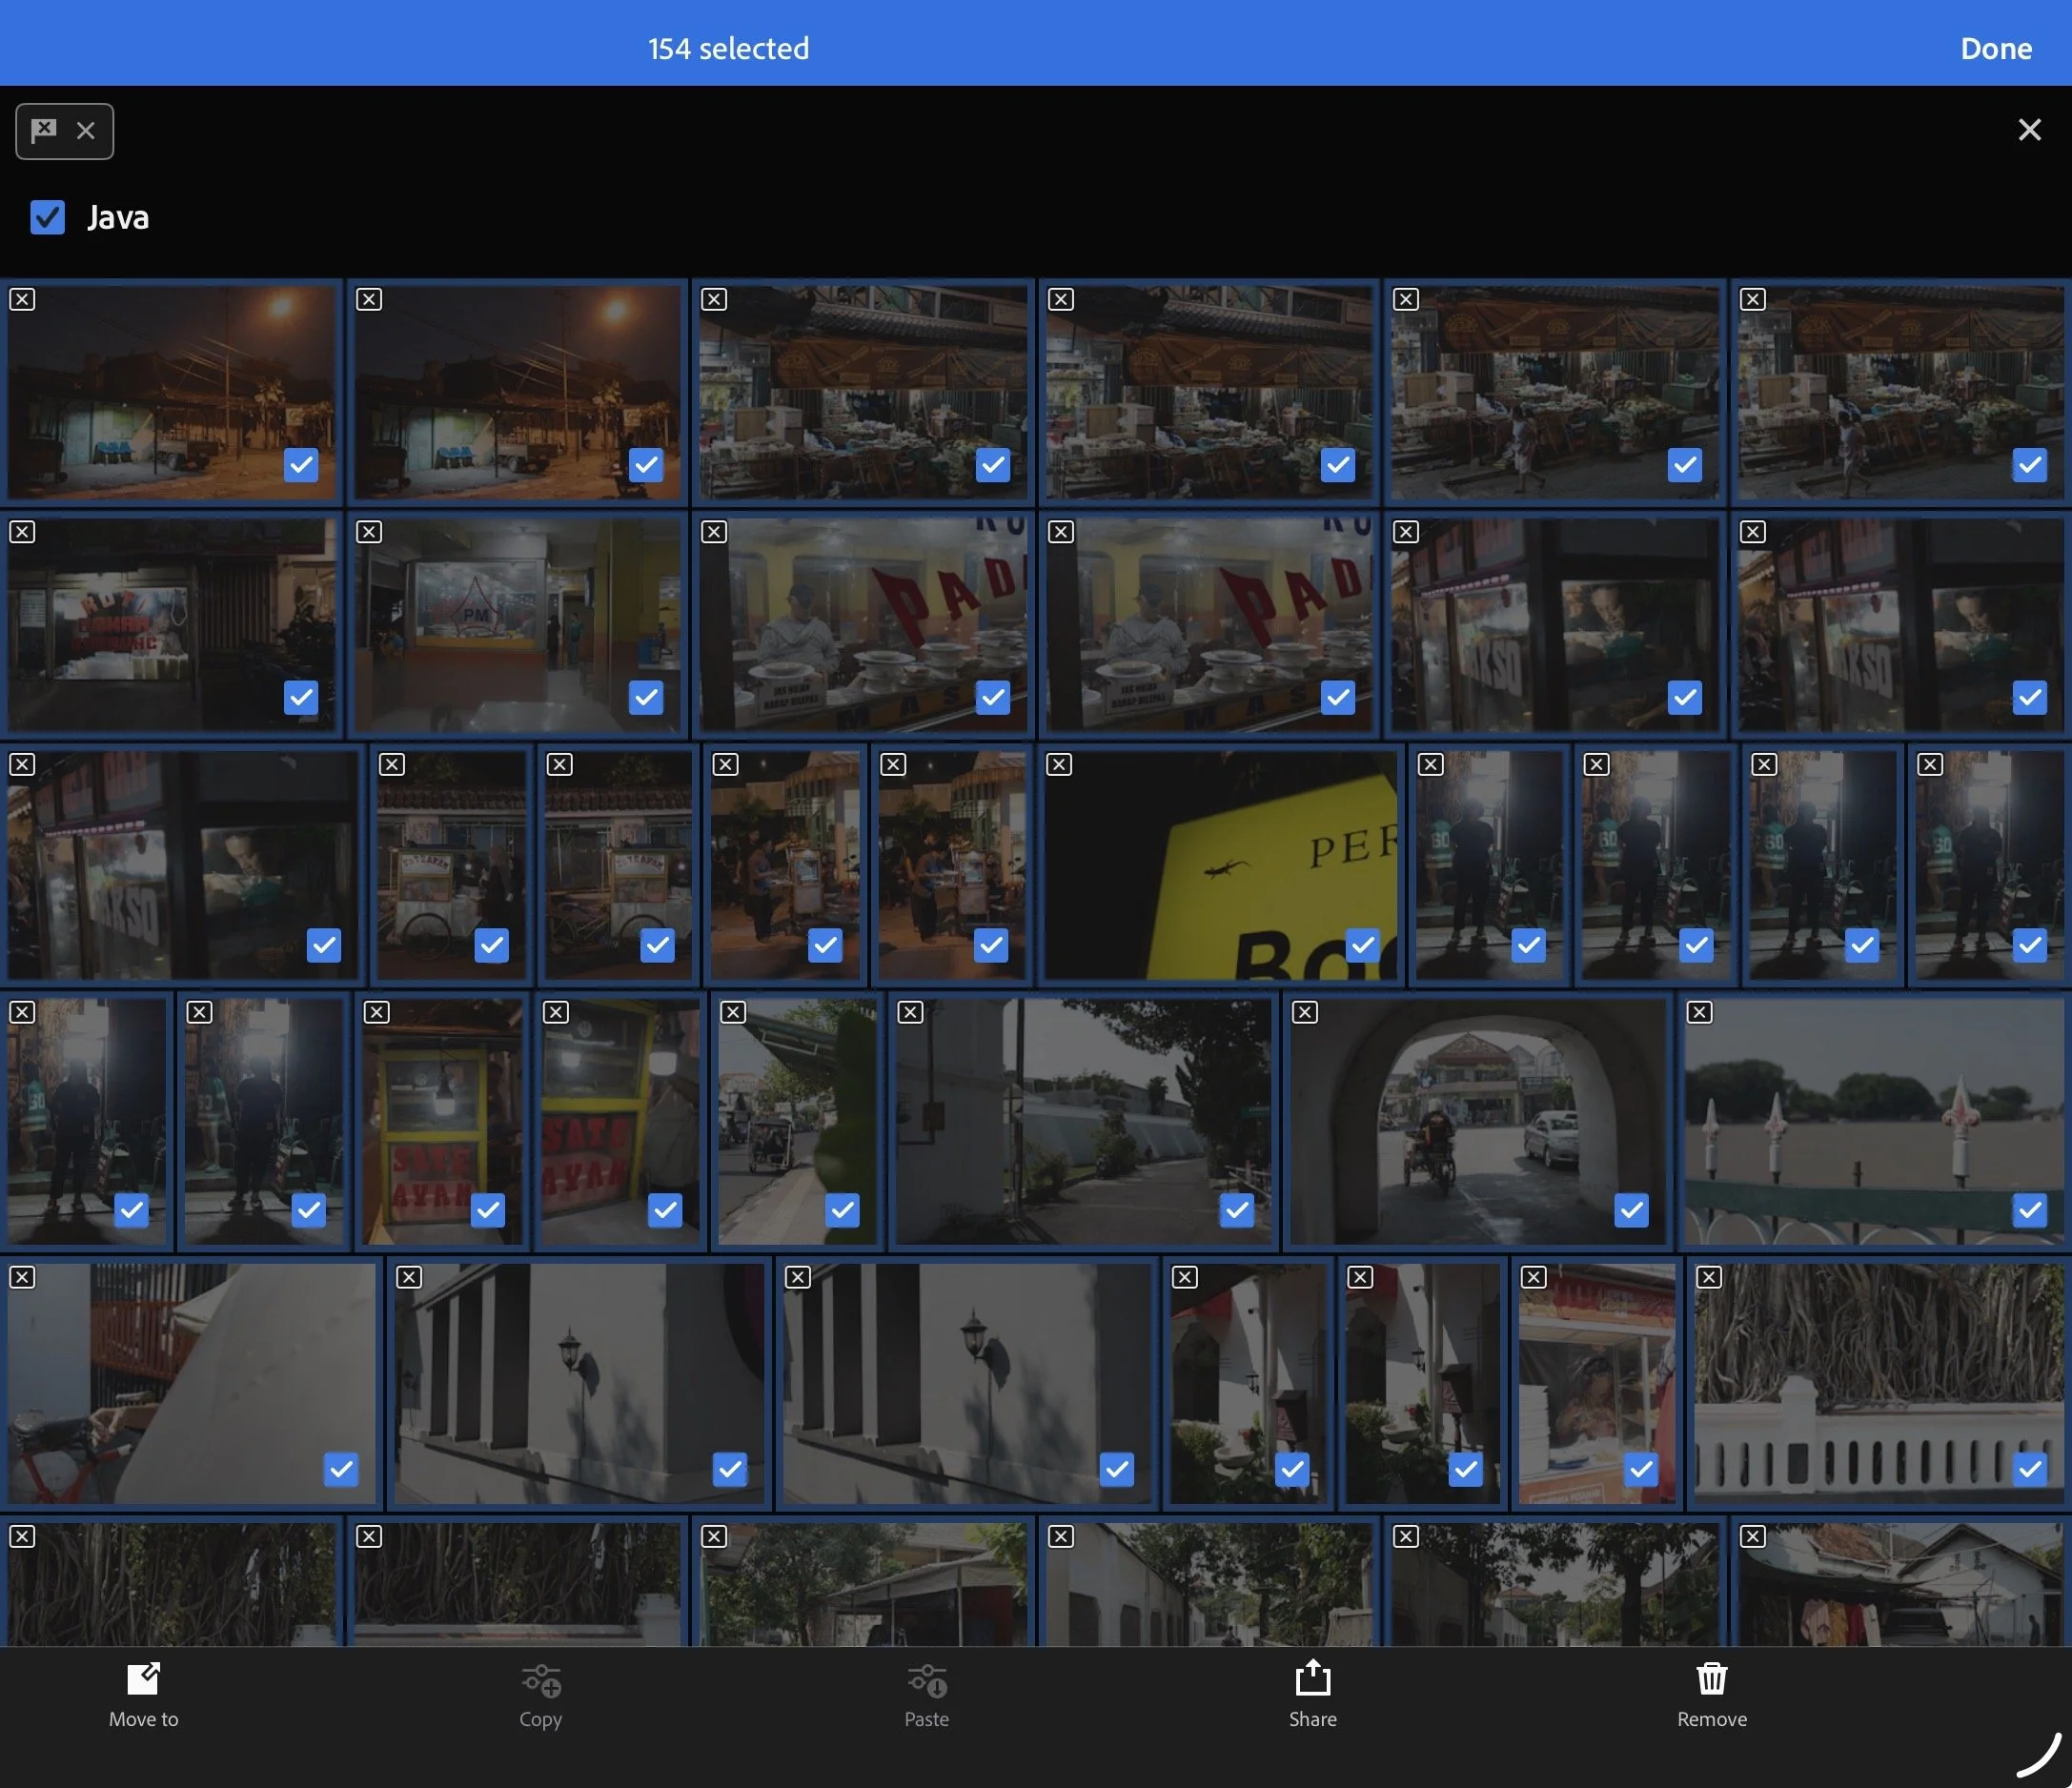
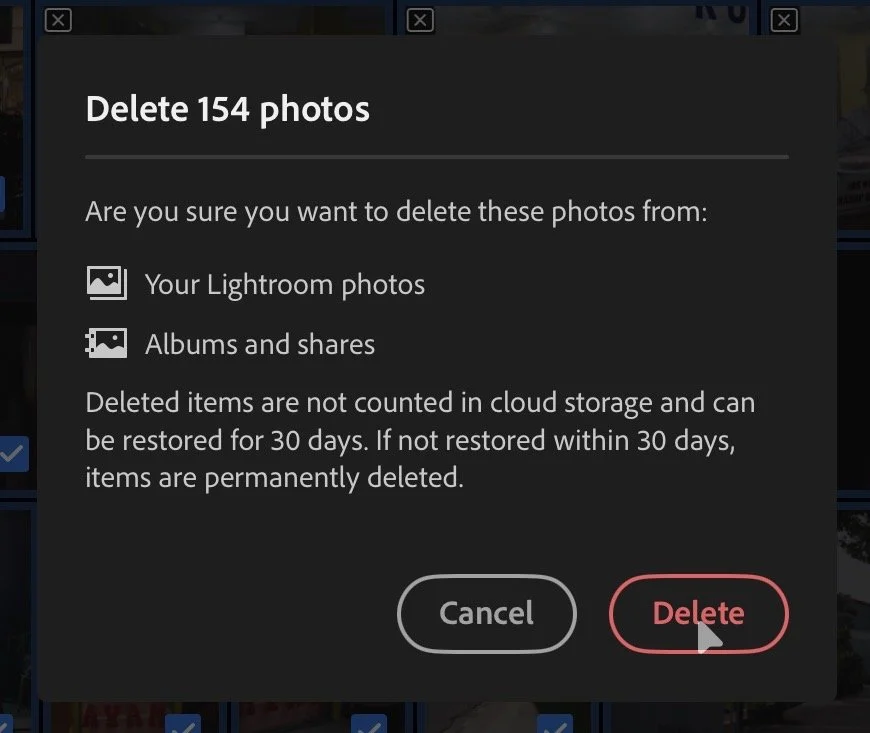
Some photographers keep everything they ever shoot. Perhaps I would too if I had a home base with a large NAS (Network Attached Storage) system, but I'm not in that position, and organising and editing thousands of photos can be overwhelming enough as it is. Add to that my current limit of 1TB of Lightroom cloud storage, and I'm pretty ruthless with what I keep and what I get rid of.
The Workflow - Initial Editing
Once synced and culled, you can then work on the files as reduced-resolution versions of the full files - this helps limit the amount of downloading and re-syncing following edits, making the process a bit smoother. The caveat here is that you'll sometimes need to be connected to decent Wi-Fi so you don't want to throw your iPad out of the window.
My first step is to take all of the remaining images and apply my Every Day Preset (available here). Some photographers like to edit each photo individually, but I often struggle with editing for long periods, and I don't over-work my images anyway. This way helps me see what images work with my style or can be significantly aided by editing, and separates those that just won't work.
Sadly, there's no neat way to do this like in the desktop version, where you can batch add presets.
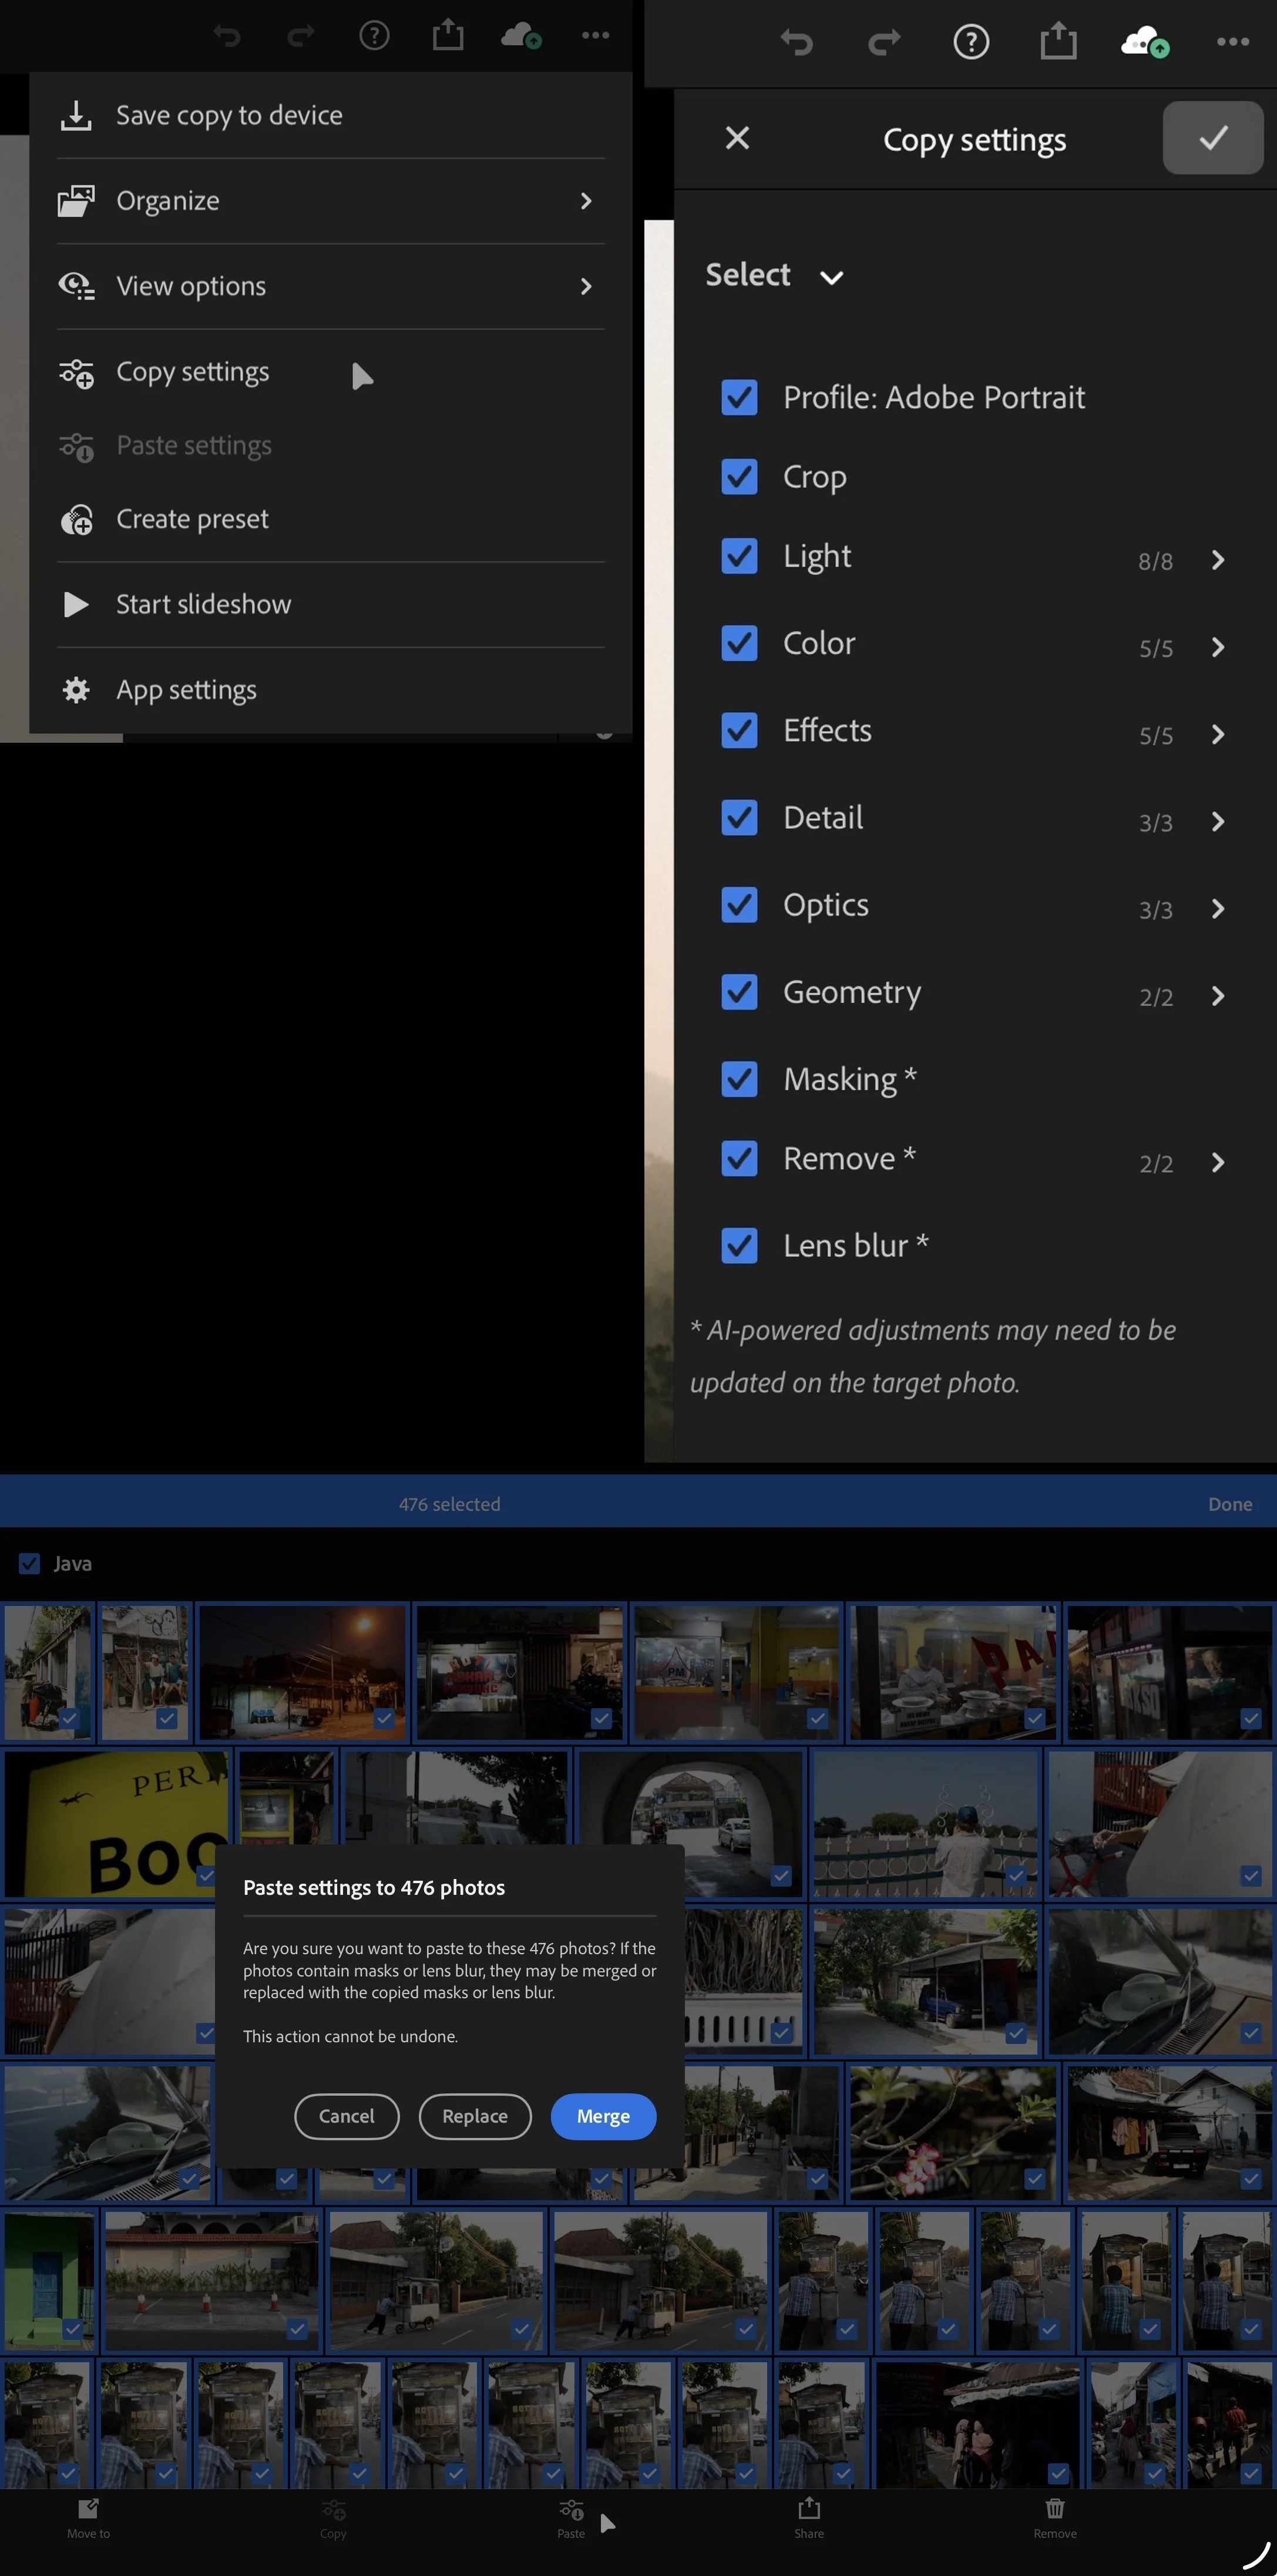
The best way I've found is to select, open up and apply the preset to the first photo using the Preset tab near the top right. Once applied, go to the top right three dots to batch edit > Copy Settings > Select All (providing the only thing you have done is add the preset) > Click the Tick and your settings will be copied to the clipboard.
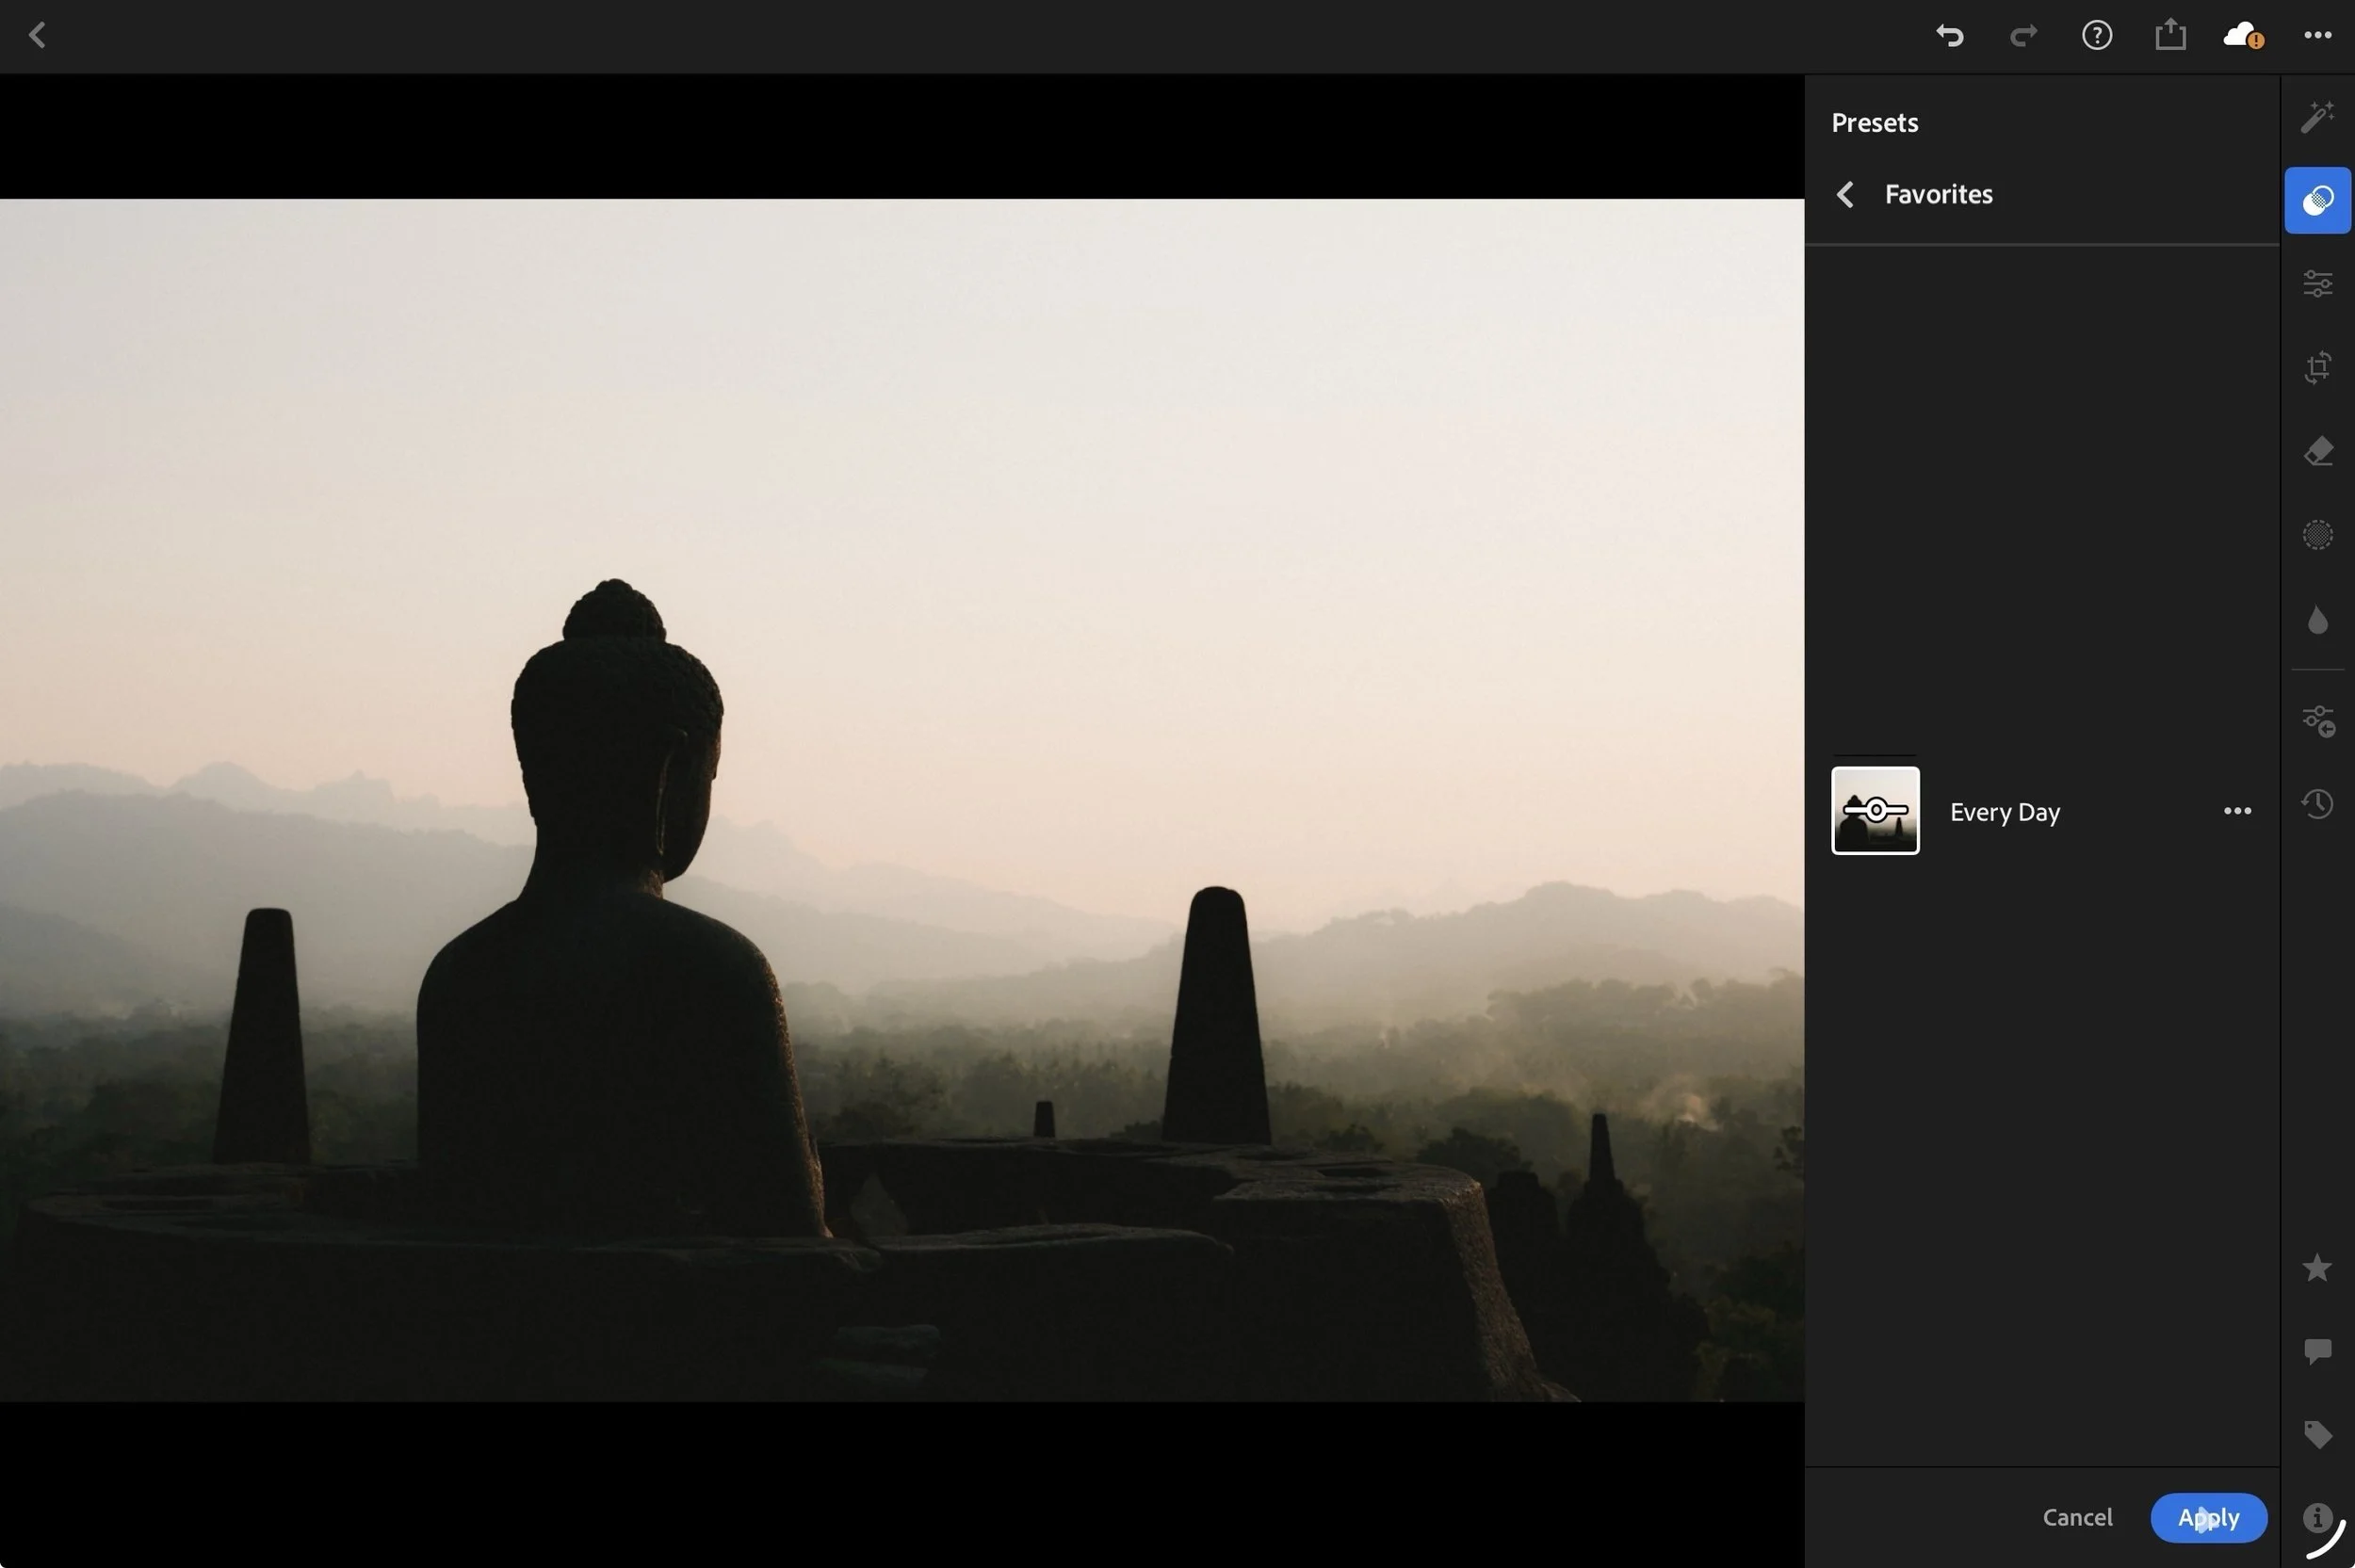
RAW image, prior to Every Day Preset being applied
Then go back to the album (G key), go to the top right three dots again to batch edit > Select > Click the box next to the Album name > once highlighted, click Paste at the bottom of the screen. If the warning message comes up about replacing or merging masks and lens blur, just click Replace. Lightroom will then apply the preset to all of the photos in the album.
The Workflow - Second Pass and Flagging
Once the preset is applied, I have a better idea if an image is really worth keeping or sharing. I will repeat the same process as above for the first pass by rejecting anything that I don't want to keep (and then deleting them), but this time I will flag the good stuff using the P key (picked). Anything that doesn't require further attention, has potential future use, or I'm not sure about will remain unflagged. Anything that I know is a portfolio-worthy shot is given a 5-star rating (using the 5 key) - this does not happen very often at all!
By this point, I have a set of images that I have thinned out to the reasonable (maybe some good) stuff, and I can press forward to full editing.
The Workflow - Full Editing
This is when the pencil shines. Doing this part with the pencil in hand rather than a trackpad or mouse just feels so intuitive, and you really get involved in each image.
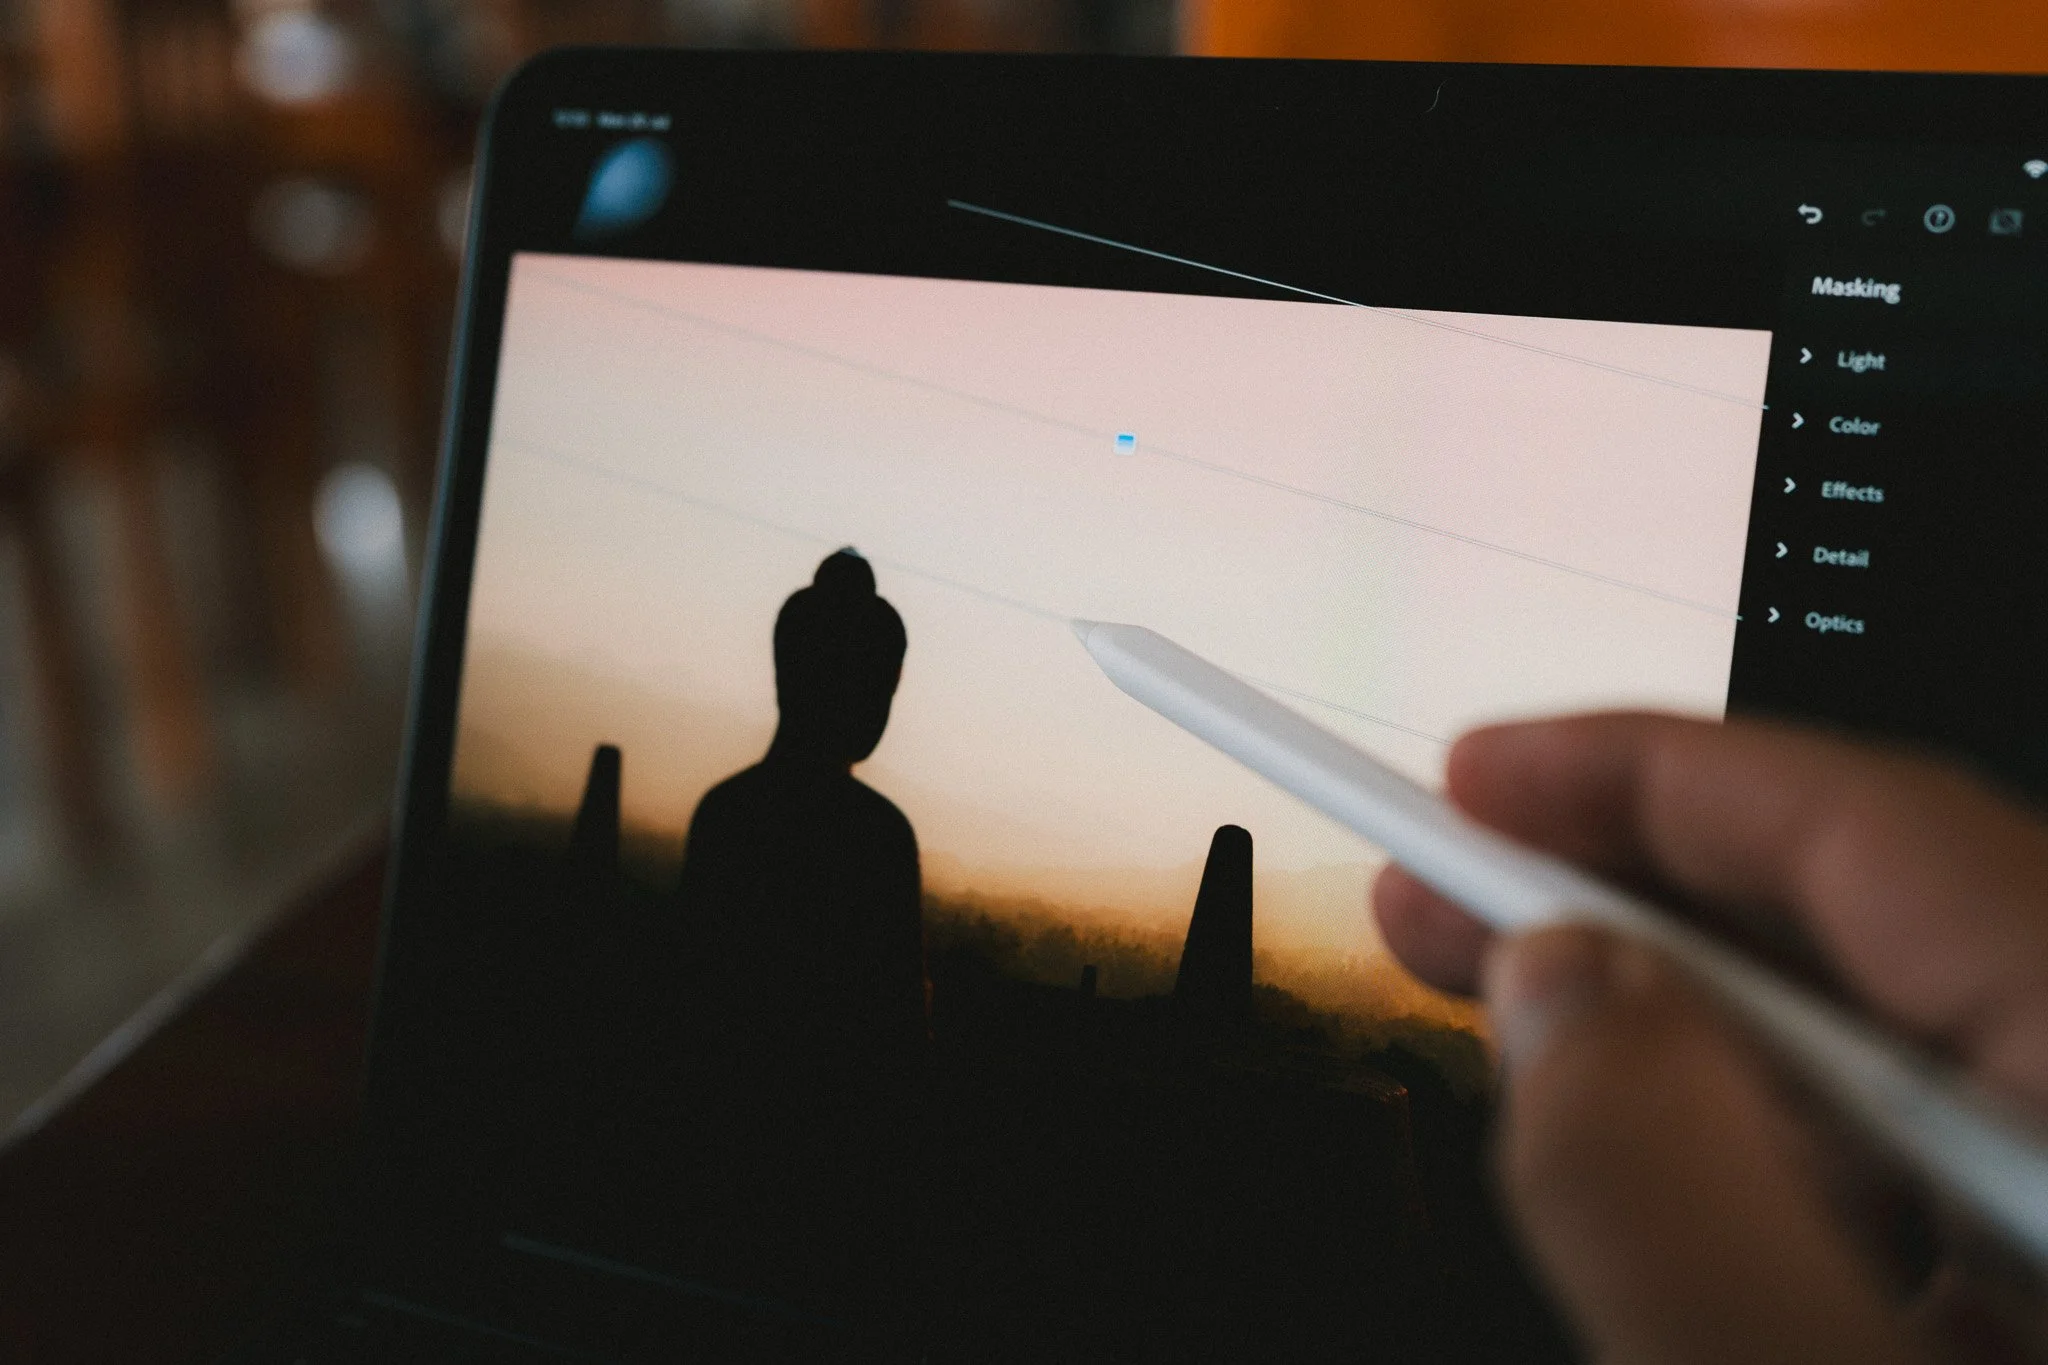
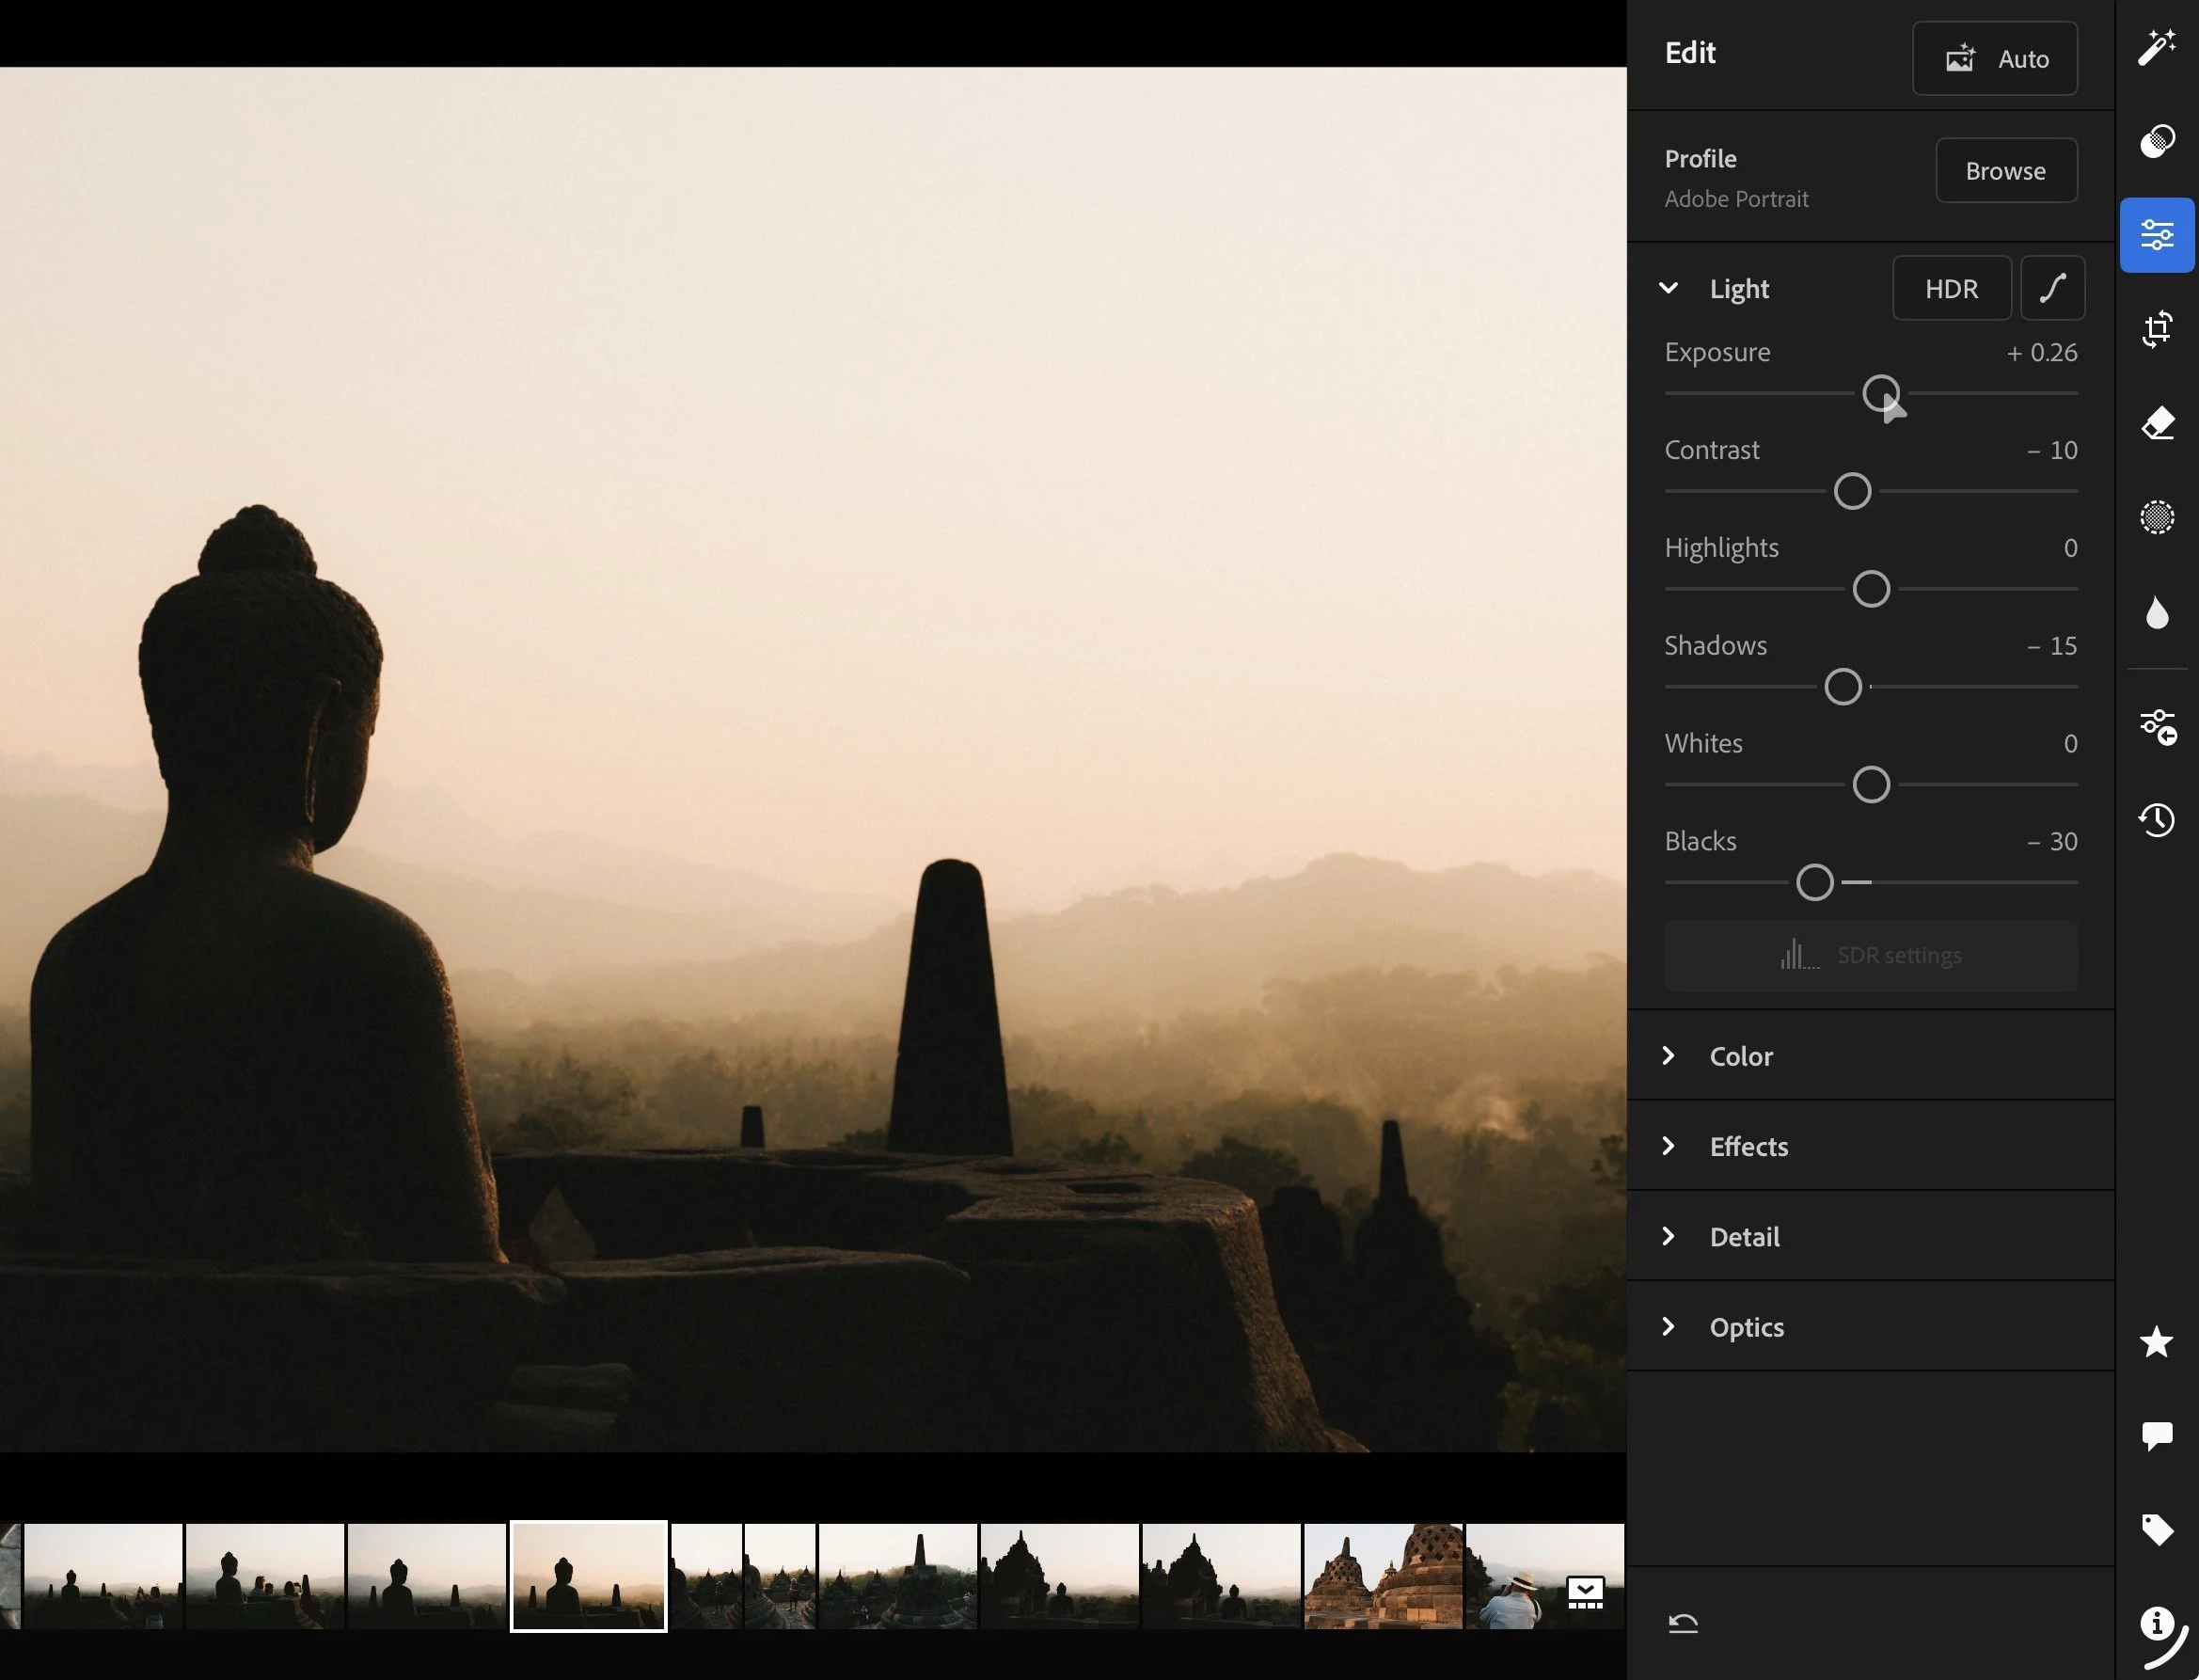
I filter out everything I've flagged as picked (using the same filtering as before, just with the Picked flag instead), then work through each of these images one by one.
This is where I'll think about applying different presets if they are more suitable, but most importantly where I start really editing. I usually work through the following, in order:
- Exposure
- White Balance
- Cropping
- Then down the editing panel from top to bottom, through Exposure, Colour, Effects and Detail
- Removal of any minor distractions (I never do wholesale or major removals to alter an image)
- Whether Masking will add anything to the image (again, I never try to alter the image to the point where it's unrecognisable from what I saw and felt when I took it)
- Final touches
As with any editing process, it's deeply personal, so I don't expect any two people to have exactly the same approach. However, I will do a dedicated post on my full editing process, so as not to clog up this workflow post too much.
The Workflow - Exporting
Once I've edited the images I care most about, I'll export them into my iCloud Drive, external hard drive, or onto my phone for sharing, depending on where they're going.
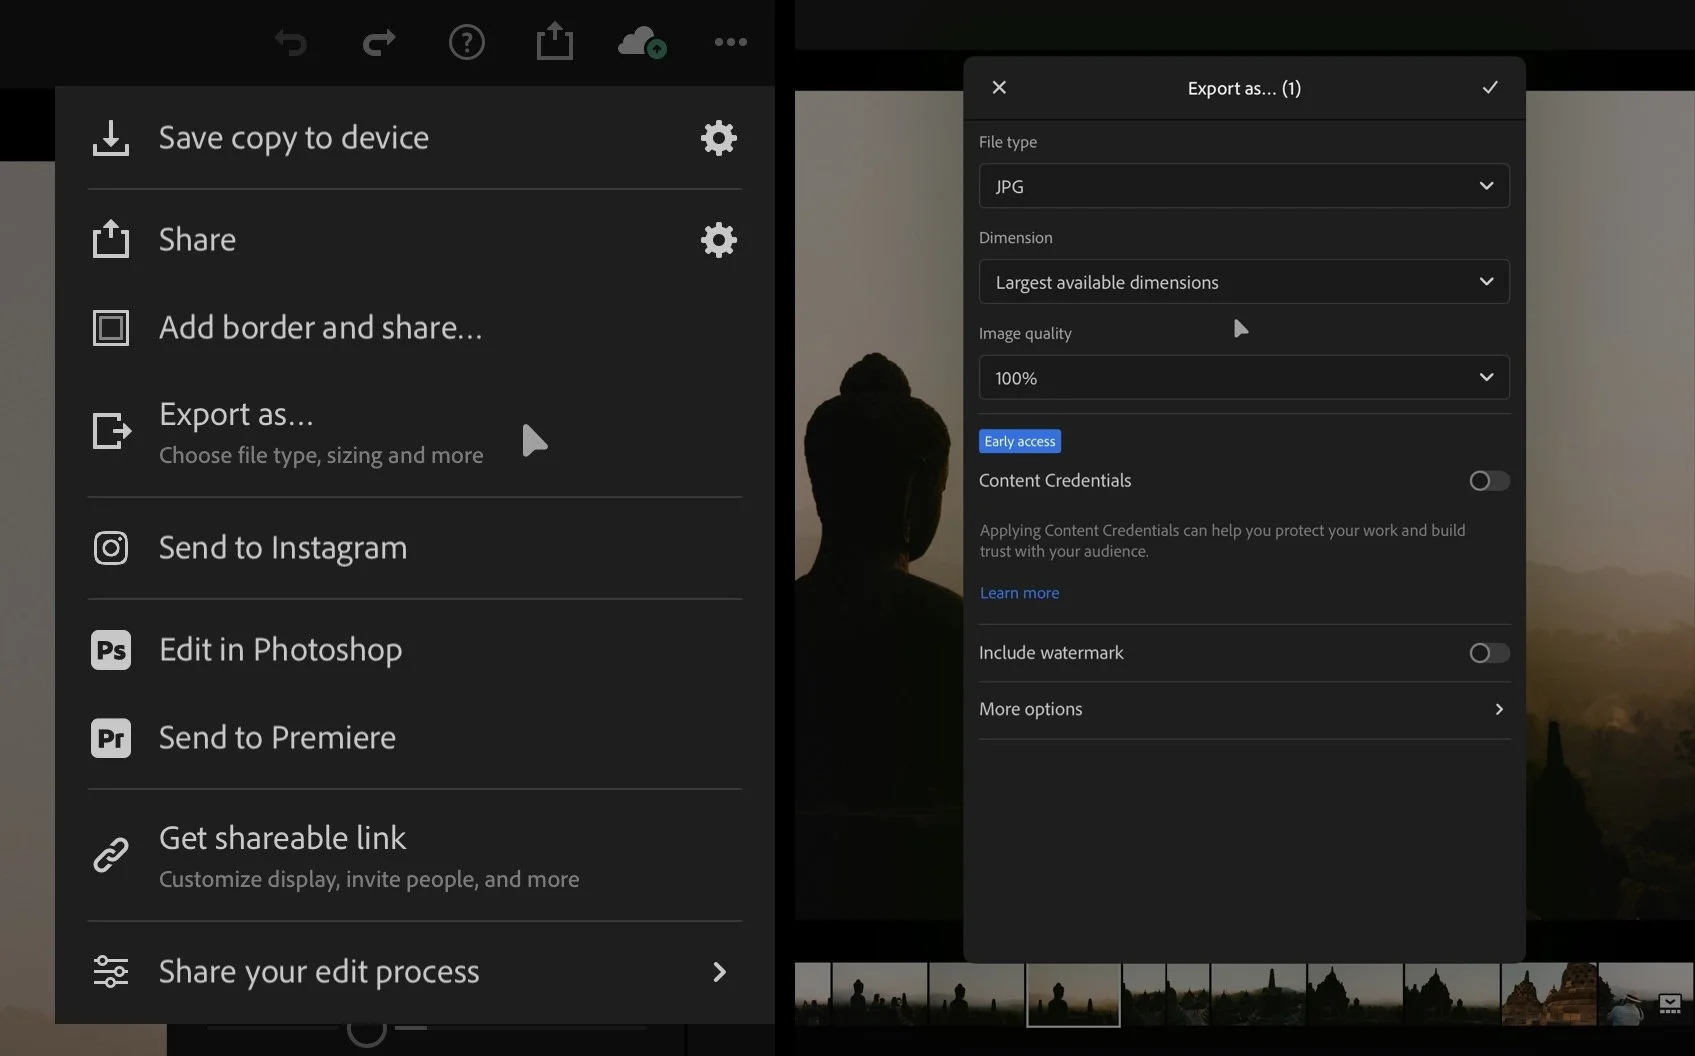
Select the images for exporting as before > Click the Share icon > Export as…
This brings up an export window, where I have two main export settings:
Full Resolution - for iCloud/external drive backups, the print store, competition entries, etc., where max file resolution is required
- JPG
- Largest available dimensions
- 100% quality
- More options
- Custom Name (depending on its destination)
- Output Sharpening Default + Screen/Paper (depending on destination)
- Colour Space: sRGB
Social Media/Portfolio Gallery/Blog Posts
- JPG
- Small (2048px)
- 100% quality
- More options
- Custom Name (depending on its destination)
- Output Sharpening: Default + Screen
- Colour Space: sRGB
Once Lightroom has exported the files, a window pops up that allows you to choose where to save them or how to share them. For social media stuff, I usually AirDrop the photos to my phone as it's the neatest way. Annoyingly, you can't do both one after the other - if you share them via AirDrop first, the selection then disappears once it's complete, and then you have to repeat the process.
Hard Drive Backups
Occasionally, I will move my best work or personal photos from the Adobe Cloud to a 1TB SanDisk SSD hard drive to make sure I have at least some control over it. This will only be the full JPEGs though, not the RAW files. In all the years I've been taking pictures, I've very rarely gone back to a RAW file from way back when to work on it again - styles change over time, but if you just go back and re-edit all of your old images, the story of your style and photographic development will be lost.
To do this, I connect my external hard drive to the iPad using a USB-C cable, and once exported from Lightroom, I can save the images to Files, selecting the folder structure in the external hard drive.
That's my full travel photography workflow from start to finish using the iPad Pro. Is it perfect? Far from it. Let's discuss the problems.
iPad Pro for Travel Photography Problems
As mentioned above, the mobile version of Lightroom available on the iPad is not the best for a couple of reasons. Firstly, there is currently no decent AI Denoise option. While modern sensors are exceptionally good in low light, there is the odd occasion I'd like to be able to use it. AI Denoise is available on the desktop, cloud-based version of Lightroom, so perhaps it's only a matter of time before it makes its way to the iPad.
Secondly, batch editing images is a little clunky, and the keyboard shortcuts you can use to zip around Lightroom on a laptop just aren't available on iPad. The ability to use the screen and a pencil helps this somewhat, but it's a different way of working for sure. This is largely a minor issue though. The biggest issue is the fact you're working on a cloud-based system in the first place.
This does mean that your files are always open to the threat of cyberattacks or servers going down, but again, that's not my biggest concern. While you can perform the same editing process on local images, I only have the 256GB version of the iPad, which also forces you to use cloud storage all the time.
It's very easy to clog the iPad up with big RAW files, and whilst travelling, shifting them to the cloud requires a lot of Wi-Fi and a lot of processing power on the M4. If you have a poor connection (which happens often when you're travelling), it takes forever to sync the images to the cloud, which bogs down the iPad despite its M4 chip. The result is both performance and battery usage suffering dramatically. If you try to edit at the same time as this, it's borderline impossible.
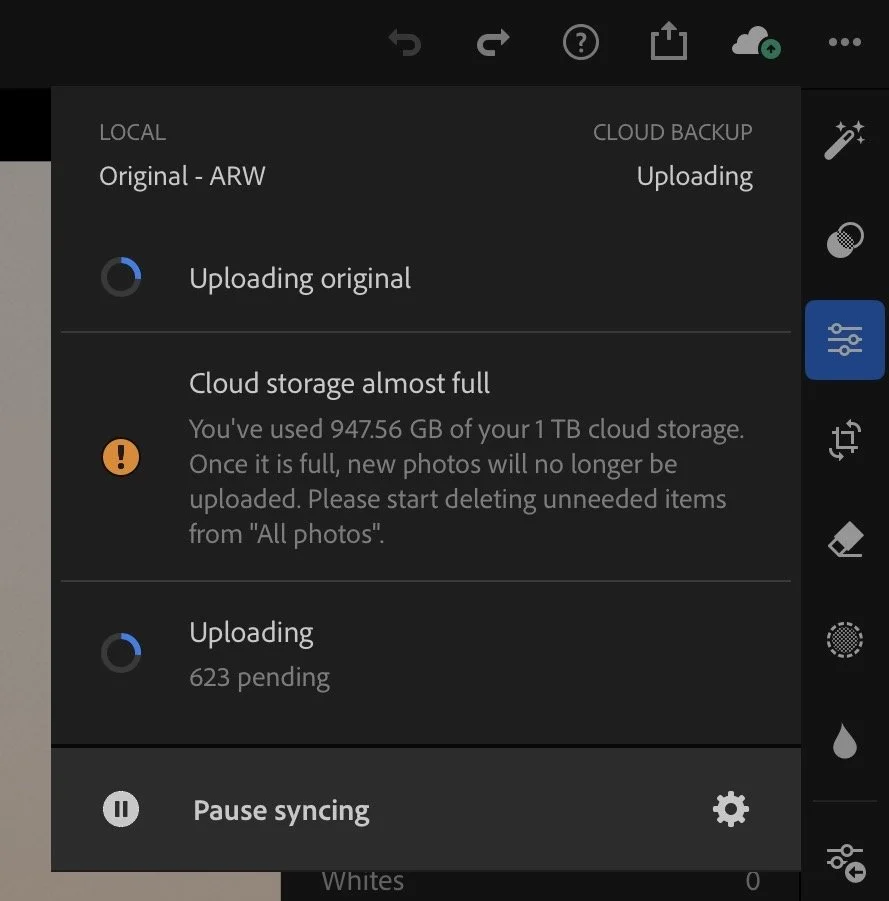
After 6 months of full-time travel, I've learned now that the best way to get around this is to only import and sync photos when you have a good internet connection, and allow the syncing to complete fully before working on any files in any depth.
The same is true for editing on the go - while it sounds doable, unless you have a decent Wi-Fi connection, downloading Smart Previews to edit and then downloading full originals for exporting can also be very slow. Again, the way around this is to turn syncing off, import your latest files onto the iPad and edit whilst they're local, bypassing any cloud-based sluggishness in the meantime. You can then sync them and back them up to the cloud later on when you have a decent connection. This obviously means that you can only really edit the latest batch of photos, not work on something from a couple of weeks ago.
Another way I manage this is by rotating multiple memory cards. This way I always have a hard copy of my RAW files until the point that I have confirmed they are fully synced to the cloud. Only when I am certain will I format the card, and I haven't had any slips yet… (touch wood).
Conclusion
Let’s return to some questions from earlier:
Can you actually edit RAW photos on an iPad Pro? Yes, absolutely, and it’s enjoyable if you have the files local or have a good WiFi connection.
Is Lightroom Mobile good enough for professional editing? Also yes - it’s a powerful piece of software that you can get excellent results on. There are plenty of professional photographers producing outstanding work on iPads. Almost all of my work is edited this way, and I’m sure you’d not be able to tell unless I told you so.
Is photo editing from the cloud whilst travelling possible? Yes - but with caveats. If you’re completely off-grid, you may struggle unless you have a lot of storage space. It also depends entirely on where you’re travelling, but even then, there are ways around it with external hard drives and the rotation of memory cards.
So, is the iPad Pro for everyone? No, probably not. Can it do 90% of the job of a MacBook Pro at a much lower cost and with a significant portability advantage? Yes.
I am quite a relaxed travel photographer - in that, I mean I don't have the demands of deadlines and clients that need deliverables despite my location. I can manage the drawbacks of the iPad Pro workflow by not trying to do everything all at once, but if you do have a period of time without decent Wi-Fi, it can get a bit messy.
Despite that, working on the iPad as an all-in-one travel solution is often a joy. Using the pencil to edit is a wonderful experience, and twinning it with the keyboard makes all manner of work a doddle. Writing blogs, managing my website, watching videos, browsing the internet, etc., is a much better experience than using a bigger laptop.
If I was to make any changes to hardware, and money was no issue, it would be to get the 2TB version (which is very expensive) and instead of using a memory card reader, switch to a Thunderbolt cable for direct transfer from my Sony A7C II to the iPad.
Right now though, for me, my set up is the best of both worlds, and I'd encourage you to give it a go if you're looking into it.
If you've get some value out of this iPad Pro Travel Photography Workflow post, then please consider supporting me and my work by purchasing my Every Day Preset here. It's a fundamental part of my process and will cost you less than a coffee!
If you'd like to receive email updates on new blog posts, products for sale and other general stuff, then please consider signing up to the email list below.
Cheers.